
In the StackingWizard article, we got a clean stack of M 20, the Trifid Nebula. But a stacked image isn't a finished photo yet: it's dark, the colours are dull, and the sky background isn't necessarily even. That's what processing is for.
This is often where beginners give up. Classic software offers dozens of tools at once, without saying which ones to use or in what order. AstroWizard, by the author of StackingWizard, turns the problem around: nine steps, always in the same order, one thing to do at a time. With a live preview, and an Undo button to go back at any moment.
The tool is free, available on Windows, macOS and Linux, and still in beta. The interface is in English, and I explain the terms along the way.
A note on my method: I first test each piece of software on my M 20 files, shot through a refractor. There are fewer of them than after a night with a smart telescope, but each frame is heavier: about 4 times more pixels than a Seestar S50 frame. The goal is mainly to judge how comfortable the processing is. Speed mostly matters at the stacking stage, when hundreds of frames have to be digested.
Last-minute update. Just as I finished testing the tool and was publishing this review, an update came out. Here's what's new, which I haven't been able to test yet.
StackingWizard Beta 4.6: hot pixels (sensor pixels that stay abnormally bright) are fixed right at stacking. On a night without darks, the tool finds them from the frames themselves and repairs them in every frame. It's on by default, and steps aside if you provide darks. The gradient is left in on mosaics and drizzled nights, for AstroWizard to handle in step 3. Camera RAW files now support drizzle, a night is no longer left unstacked when frames or masters don't match, and the Linux version gets a long list of fixes.
AstroWizard: before NoiseXTerminator runs, the tool now mends isolated pixels far darker than the sky, which made noise reduction patchy around stars. The NoiseXTerminator presets are also a little lighter than before, and Correct Magenta Stars better preserves each star's brightness.
Step 1: Load & Inspect, open your image
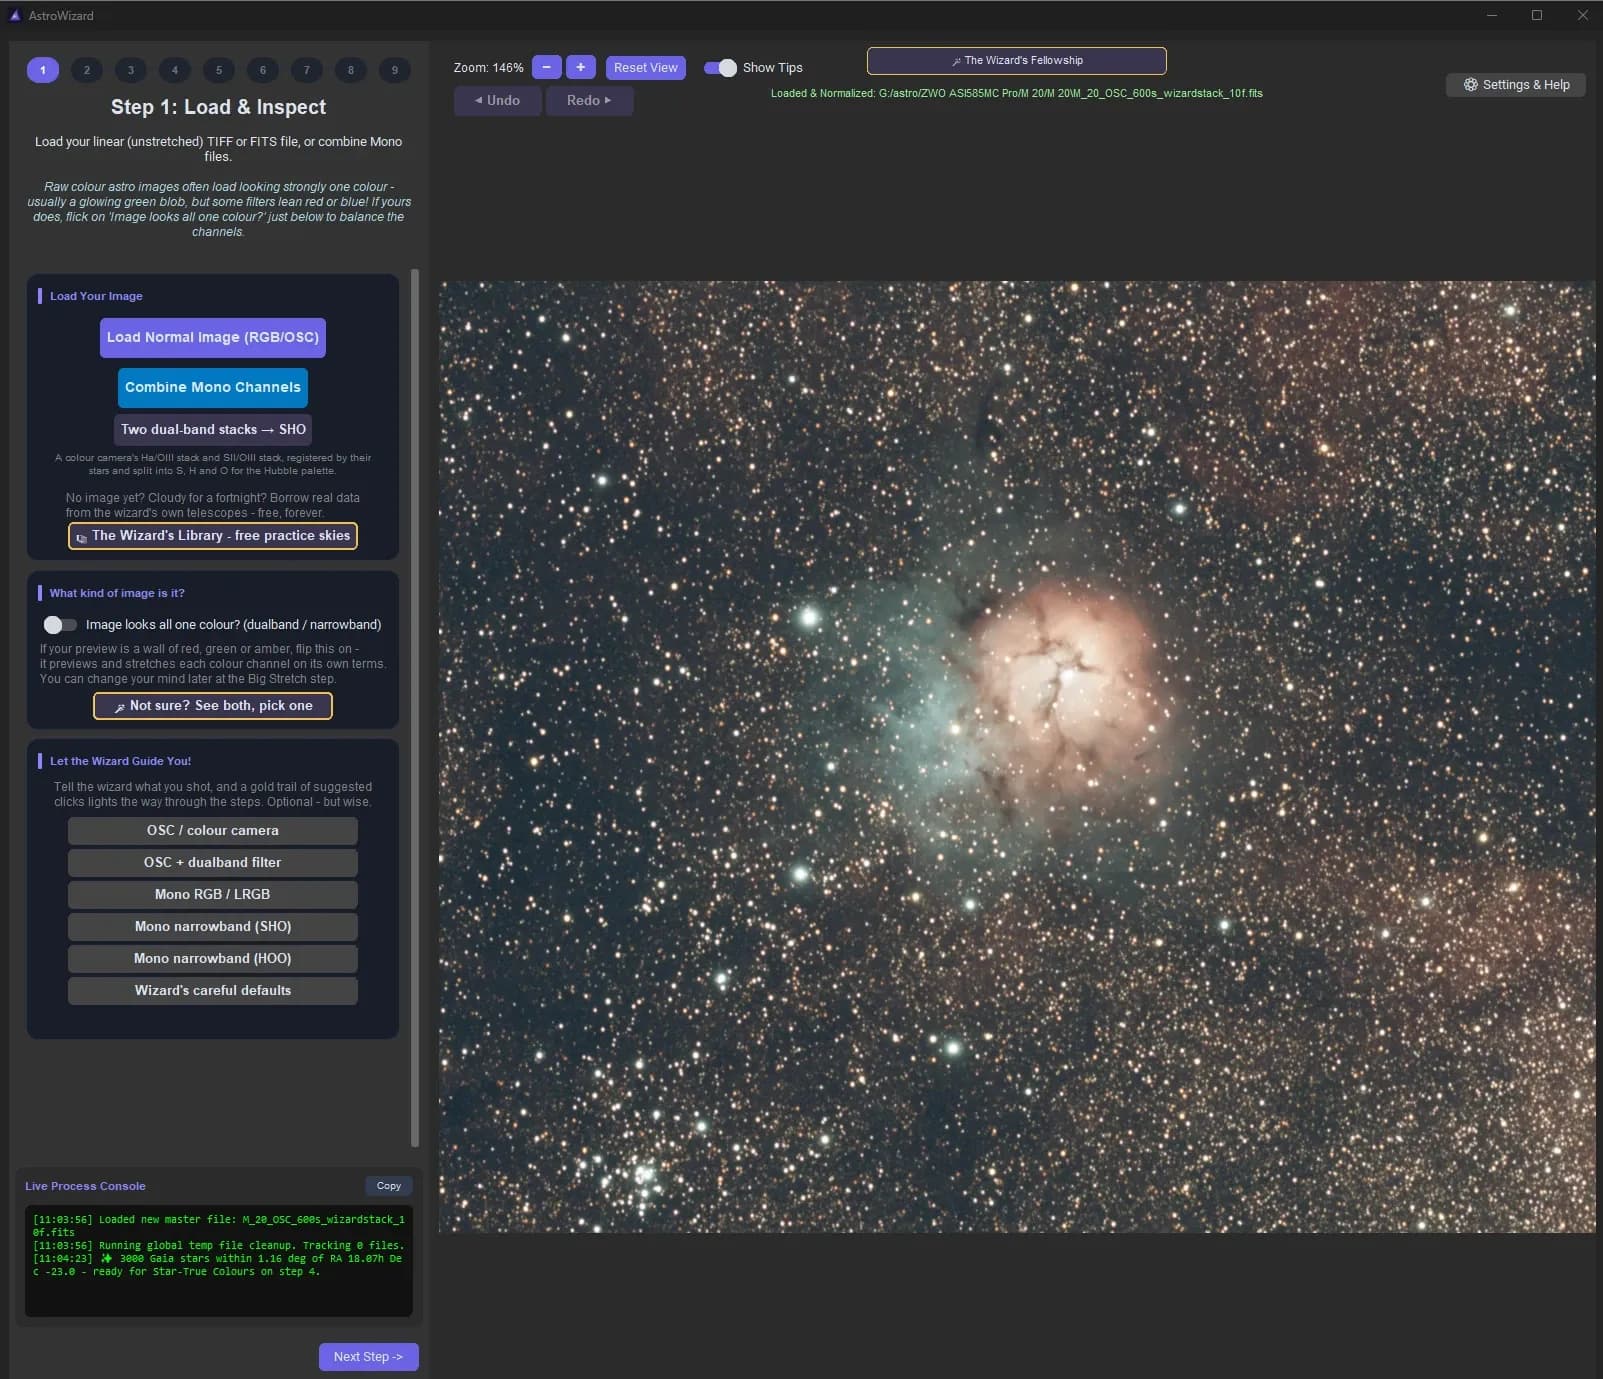
If you're coming from StackingWizard, there's nothing to do: the Send to AstroWizard button has already opened the stack here. The file name appears in green at the top, after "Loaded & Normalized".
Otherwise, one click on Load Normal Image (RGB/OSC) is enough. AstroWizard accepts stacks in FITS, TIFF or XISF, whatever software produced them: Seestar, Dwarf, Siril, DeepSkyStacker, PixInsight... The only condition is that the image must be "linear", meaning straight out of stacking, with no processing at all.
An idea worth keeping in mind: nothing forces you to stack with StackingWizard. You could for example stack in SyQon Studio, whose stacking is very good, then come and process the image here, step by step.
The image is brightened automatically so you can see it, but nothing has been changed yet. And the console at the bottom left shows the tool has already been at work: it recognised the patch of sky and fetched 3000 stars from the Gaia catalogue. They'll be used in step 4 to match your colours to the stars' real colours.
If you're a beginner, you don't need to go further on this screen. Once your stacked image is open, everything else can stay at its default. The only useful choice is telling the tool what you shot, in the Let the Wizard Guide You box (see below). And if your image opens all green, red or orange, which often happens with a smart telescope, turn on the dualband / narrowband option in the second box.
The other options, in short:
- Combine Mono Channels: for monochrome cameras, which shoot each colour or filter separately. This button assembles the layers into a colour image.
- Two dual-band stacks → SHO: if you used a colour camera with two dual-band filters (an Ha/OIII and an SII/OIII), the tool aligns both stacks and builds a "Hubble palette" image.
- The Wizard's Library: no image to process yet? Lukomatico shares data from the wizard's own telescopes, for free, to practise on.
- Image looks all one colour? (dualband / narrowband): images shot through a dual-band or narrowband filter often come out all red, green or orange. This switch brightens each colour (red, green, blue) separately, each at its own level. With a smart telescope, you'll often need it: as soon as you use a dual-band or light-pollution filter, and more generally whenever the image opens with a strong colour cast. Be aware that this choice changes the colours. The cast disappears and the three colours are levelled out, which brings out the red of hydrogen and the teal of oxygen. The trade-off is that the original balance between colours is no longer respected. On an unfiltered image that opens with roughly natural colours, like this one, it's better to leave it off. Nothing is final: you can change your mind at the Big Stretch step.
- Not sure? See both, pick one: shows both versions side by side, and you simply click the one that looks right.
At the top of the screen you'll also find the zoom, Undo / Redo, and Show Tips, which shows help bubbles on hover. Settings & Help is mostly for the first launch, to tell the app where the optional AI tools are installed (GraXpert, StarNet2, RC-Astro). We'll come back to it when we need it.
Let the Wizard Guide You: which guide to pick?
This is the real good idea on this screen. You tell AstroWizard what gear you shot with, and it lights up a gold trail of suggested clicks at every step, tuned to your type of image. Follow the gold and you won't get lost. Ignore it and nothing stops you.
| Guide | For | Examples |
|---|---|---|
| OSC / colour camera | Colour camera or smart telescope, no particular filter | Seestar without filter, ASI 585MC, DSLR |
| OSC + dualband filter | Colour camera with a dual-band filter (Ha/OIII) | Seestar with its LP filter, colour camera + L-eXtreme |
| Mono RGB / LRGB | Mono camera with red, green, blue (and luminance) filters | ASI 2600MM + filter wheel |
| Mono narrowband (SHO) | Mono camera with SII, Ha and OIII filters | Hubble palette |
| Mono narrowband (HOO) | Mono camera with Ha and OIII filters | Bicolour nebulae |
The last button, Wizard's careful defaults, keeps the default path.
For M 20, shot with a colour camera and no filter, it's OSC / colour camera.
All that's left is to click Next Step at the bottom right.
Step 2: Cropping & Framing
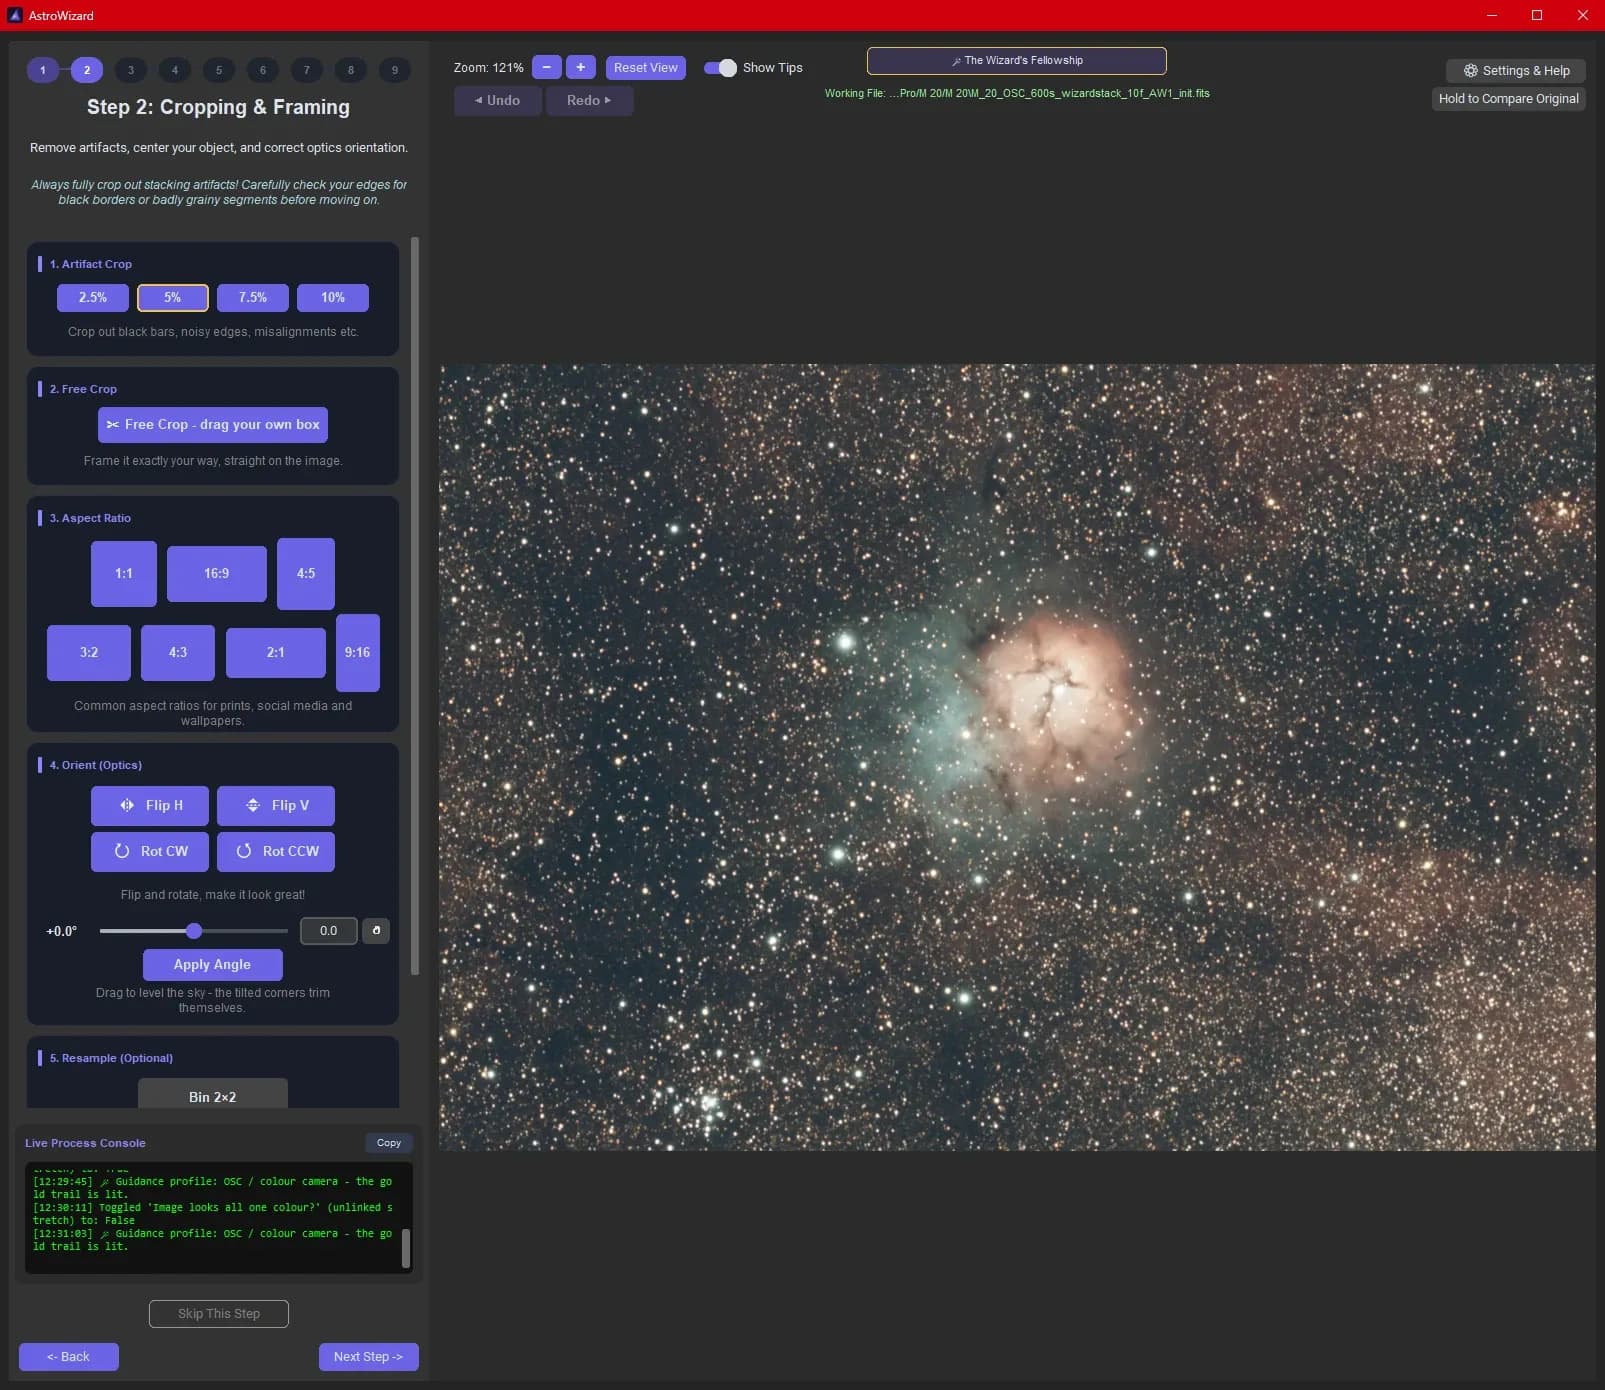
This step looks minor, but it matters. During the night, the framing always shifts a little from one frame to the next. As a result, fewer frames overlap on the edges of the stack, and you often find black bars, noisier areas or badly aligned stars there. They need to go now, or they'll get in the way later, especially for gradient removal in step 3.
- Artifact Crop: the simplest. One click trims 2.5%, 5%, 7.5% or 10% off each edge. The guide suggests 5%, which is enough in most cases. That's what I used on M 20. Still check the edges afterwards: if a black bar or grainy area remains, go one notch up.
- Free Crop: to crop by hand. Draw your own box on the image, move it, resize it by the corners.
- Aspect Ratio: ready-made formats (1:1, 16:9, 4:5, 3:2...). Handy for Instagram (1:1 or 4:5), a wallpaper (16:9) or a print (3:2).
- Orient (Optics): Flip H and Flip V flip the image, Rot CW and Rot CCW rotate it by a quarter turn. The slider below allows fine rotation, to a tenth of a degree, confirmed with Apply Angle. The corners that stick out are trimmed automatically.
- Resample (Optional): Bin 2x2 halves the image size. The image is less noisy and lighter, but less detailed. Keep it for very large or very noisy images: for a first try, leave it alone.
At the top right, Hold to Compare Original shows the original image as long as you hold it. Handy to check what you've just cut. And if the image is fine as is, Skip This Step takes you straight on.
Step 3: Background Extraction, clean up the sky
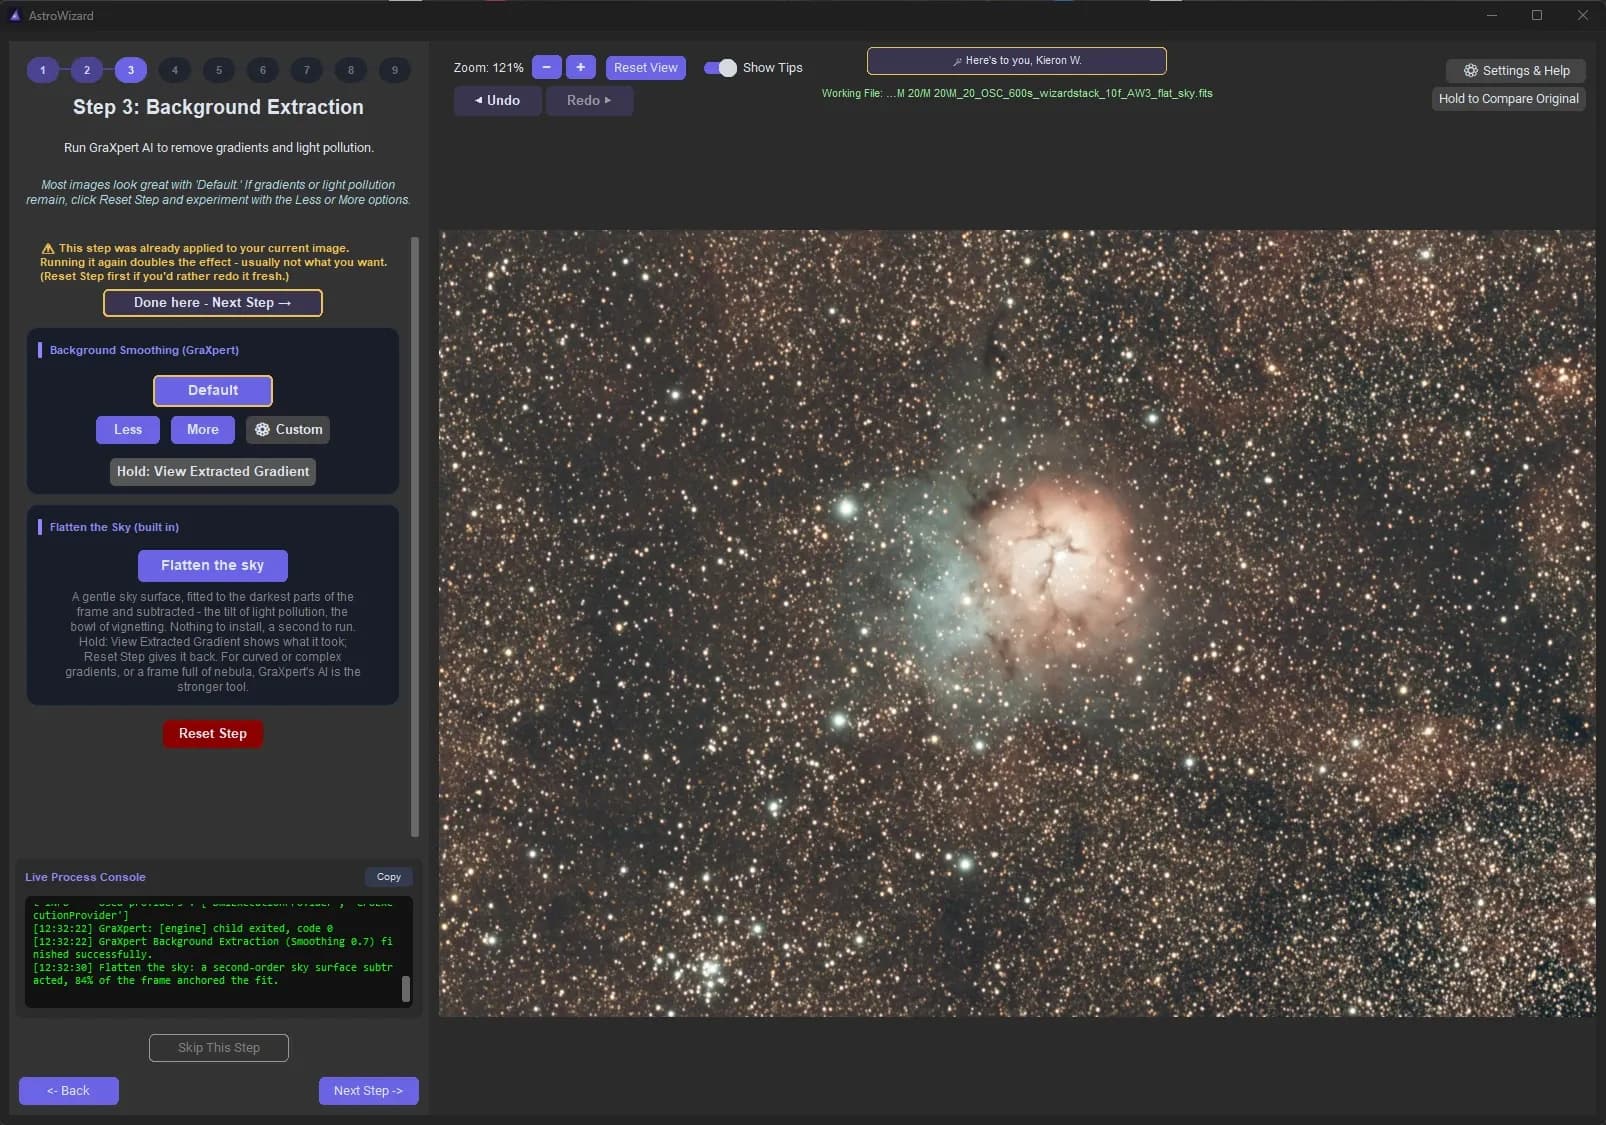
The sky background is almost never even on a raw image. Light pollution brightens one side more than the other, the Moon adds a haze, and the optics often darken the corners ("vignetting"). That's what we call a gradient. This step measures it and removes it, to get a neutral, even sky background.
Background Smoothing (GraXpert) hands the job to GraXpert, a free AI tool that's very good at this. You need to install it separately and tell the app where it is in Settings & Help. Also remember to open it once on its own and run each of its tools, so it downloads its AI models.
- Default suits the vast majority of images, and it's the guide's choice.
- Less and More remove the gradient more or less strongly. If the background is still uneven, try More. If the nebula seems to fade at its edges, try Less.
- Custom gives access to every setting, for those who know GraXpert.
- Hold: View Extracted Gradient shows, while you hold it, what was removed. You should see a smooth gradient, not the shape of the nebula.
Flatten the sky is the built-in tool, with nothing to install. It finds the darkest areas of the image, works out the shape of the sky background from them, then subtracts it. It handles a light-pollution haze tilted to one side, or vignetting, in a second. For more complex gradients, or an image full of nebulosity, GraXpert remains more effective.
On M 20, I ran GraXpert on Default, then Flatten the sky to finish the job.
Be careful not to run the same tool twice: the effect adds up. AstroWizard warns you with a yellow message if the step has already been applied. To start again cleanly, Reset Step puts the image back as it was before the step. When you're happy with the background, Done here - Next Step.
Step 4: Color Calibration, accurate colours
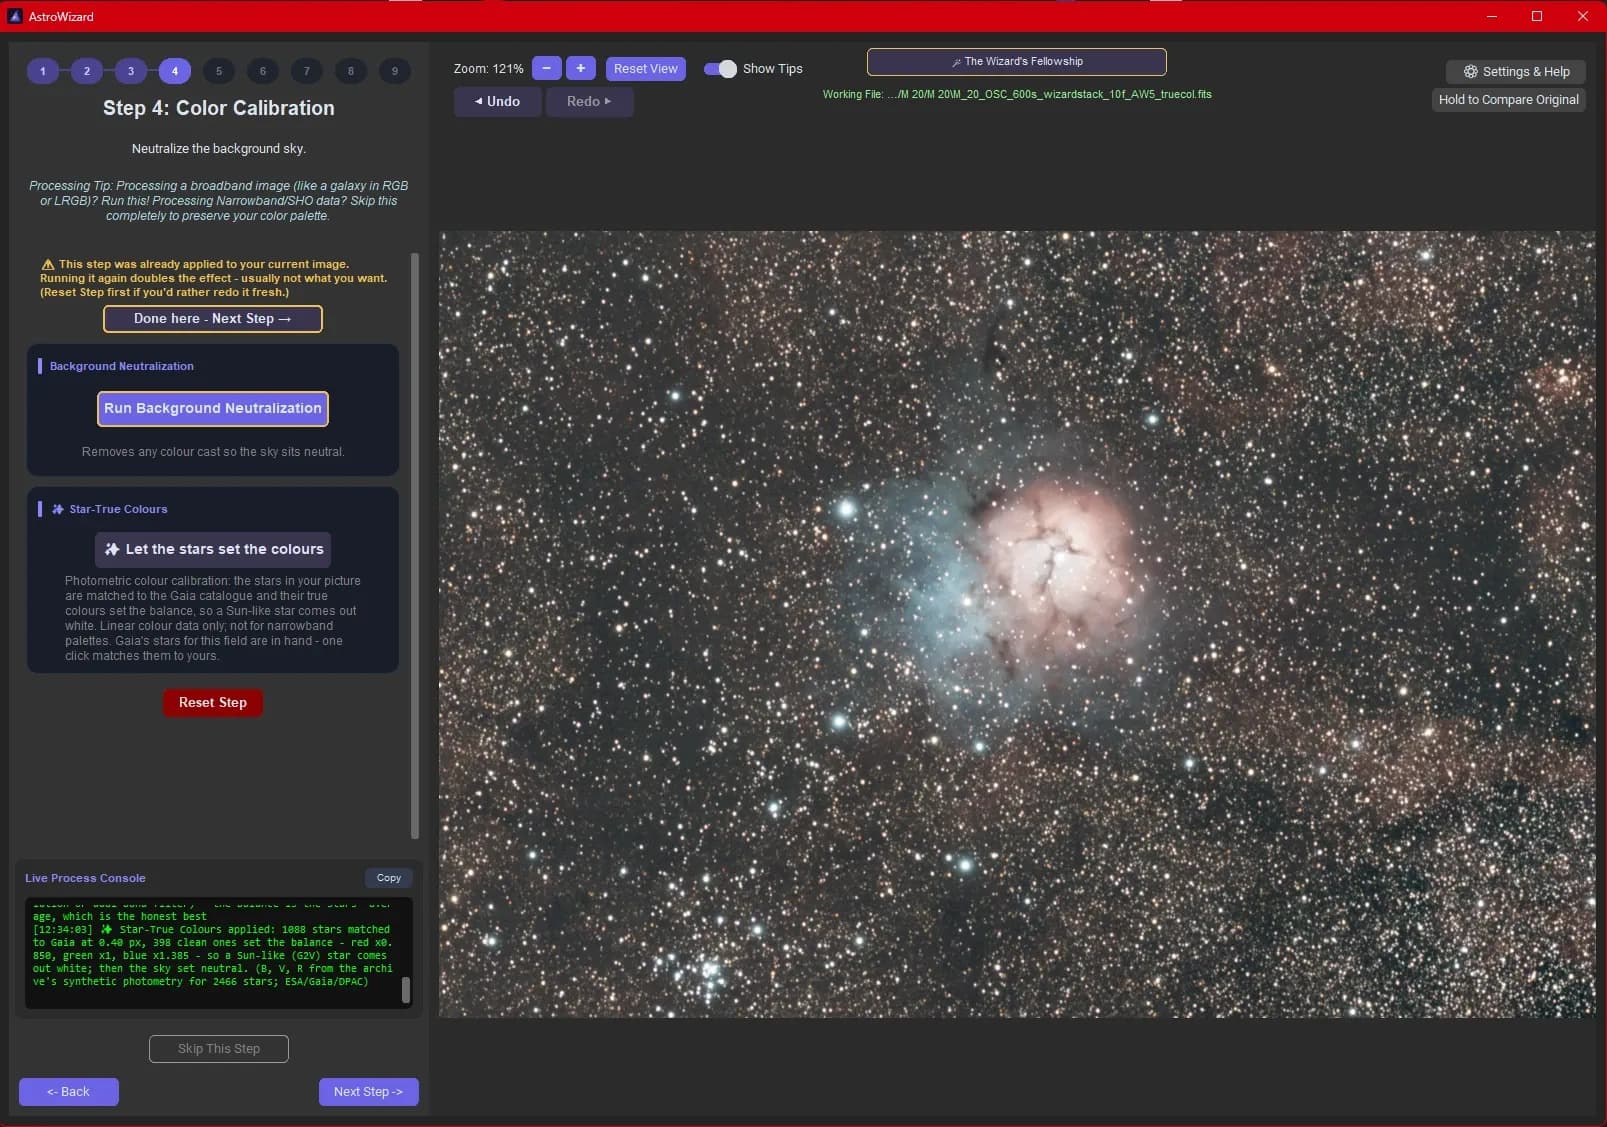
A camera doesn't see colours exactly as they are. The sensor is more sensitive to some colours than others, and light pollution adds its own tint. This step puts the colours right.
Run Background Neutralization takes care of the sky background: it removes the remaining tint (often green, brown or orange) so the sky is a neutral grey.
Let the stars set the colours goes further, and it's the tool I find most impressive. Remember the 3000 Gaia stars fetched in step 1? AstroWizard finds those stars in your image and compares their measured colour to their true colour, known from the satellite. From that it works out the correction for the whole image, so that a Sun-like star comes out white. This is called photometric calibration: colours are no longer set by eye, they're measured.
On M 20, the tool recognised 1088 stars, kept 398 well-measured ones, and concluded that red needed lowering a little and blue a clear boost. It's all detailed in the console, for the curious. I ran both tools: star calibration, then background neutralization.
One important point: this step is meant for natural-colour images, shot without a filter or with a regular colour camera. If you shot through a dual-band or narrowband filter, star calibration isn't suitable. And for Hubble-palette (SHO) images, AstroWizard even advises skipping the whole step (Skip This Step) to keep your colours.
As in the previous step, the yellow message reminds you not to rerun a tool that's already been applied, and Reset Step lets you start over.
Step 5: Deconvolution & Sharpening, gain finesse
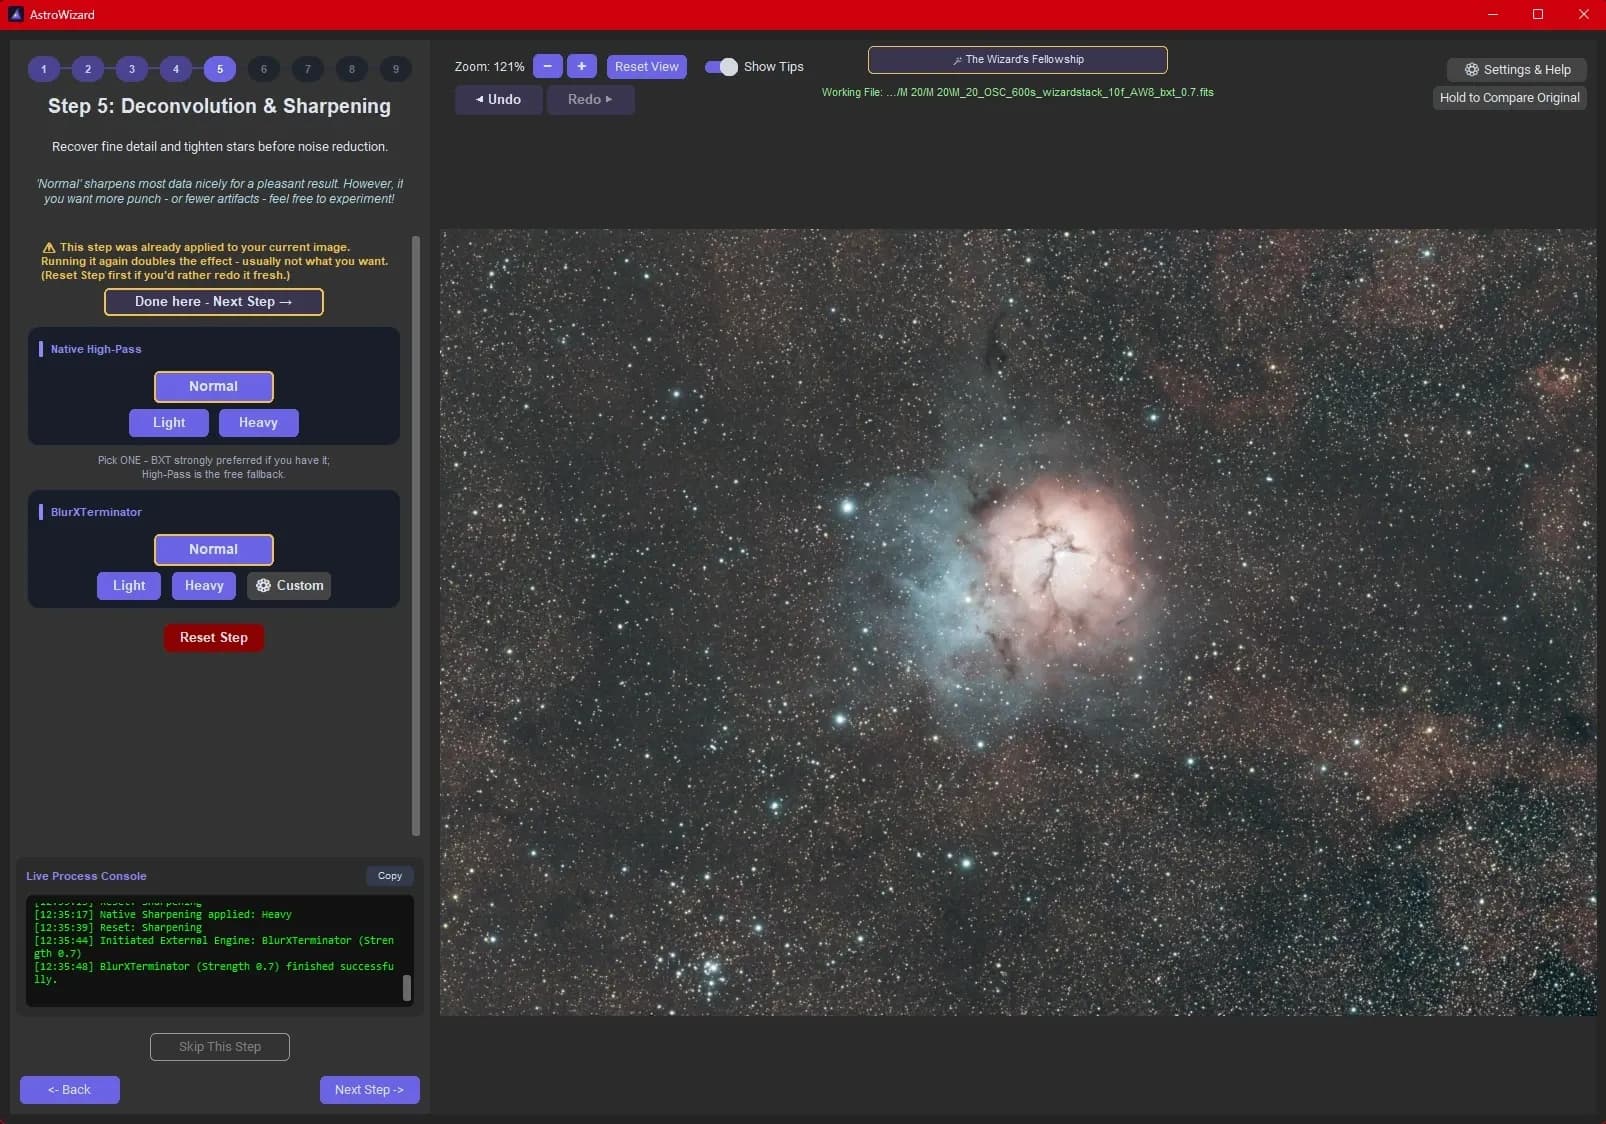
Atmospheric turbulence and the optics spread the light a little: stars get bigger and fine details blur together. This step recovers part of that lost finesse. It deliberately comes before noise reduction, on a still-raw image.
Two tools to choose from, and you only use one:
- Native High-Pass is built in and free. Three strengths: Light, Normal and Heavy.
- BlurXTerminator is one of the RC-Astro tools, which are paid (a trial exists). It uses AI to sharpen stars and details, with the same strengths plus a Custom mode. AstroWizard recommends it if you have it.
In both cases, Normal gives a good result on most images. If the stars look too strong or artefacts appear, go back to Light.
Personally, I have the RC-Astro tools, so I use them: BlurXTerminator on Normal for M 20. But the built-in tools already work well, and are more than enough to support the processing. The difference is still noticeable, especially on the stars, as the comparison below shows (drag the slider).
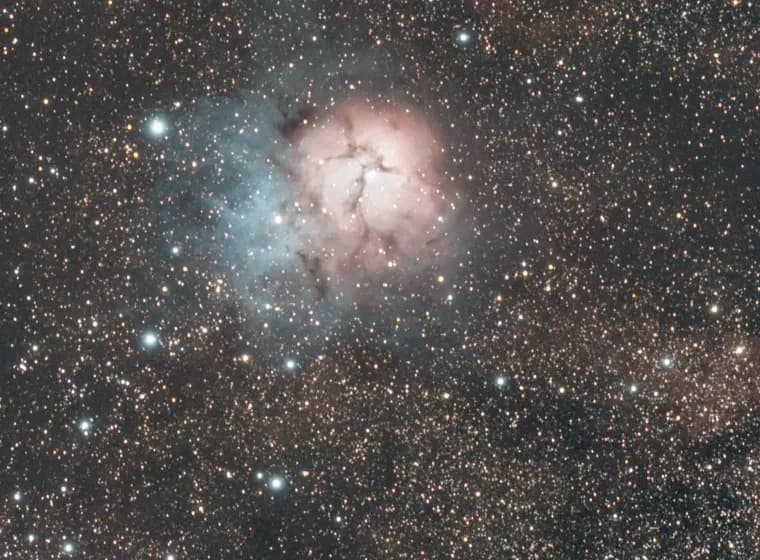
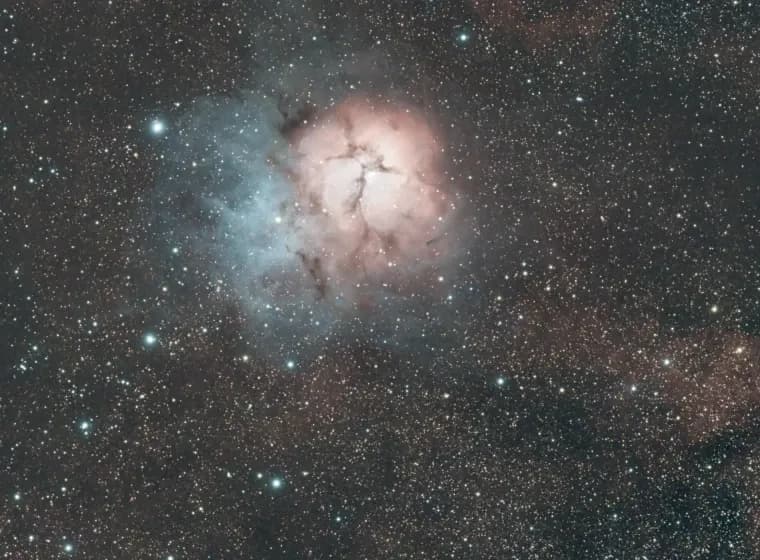
With BlurXTerminator, the stars are clearly finer and more discreet, which lets the nebula breathe. With the High-Pass, even on Heavy, they stay bigger and more prominent. The nebula's details come out well in both cases.
Step 6: Linear Noise Reduction, calm the noise
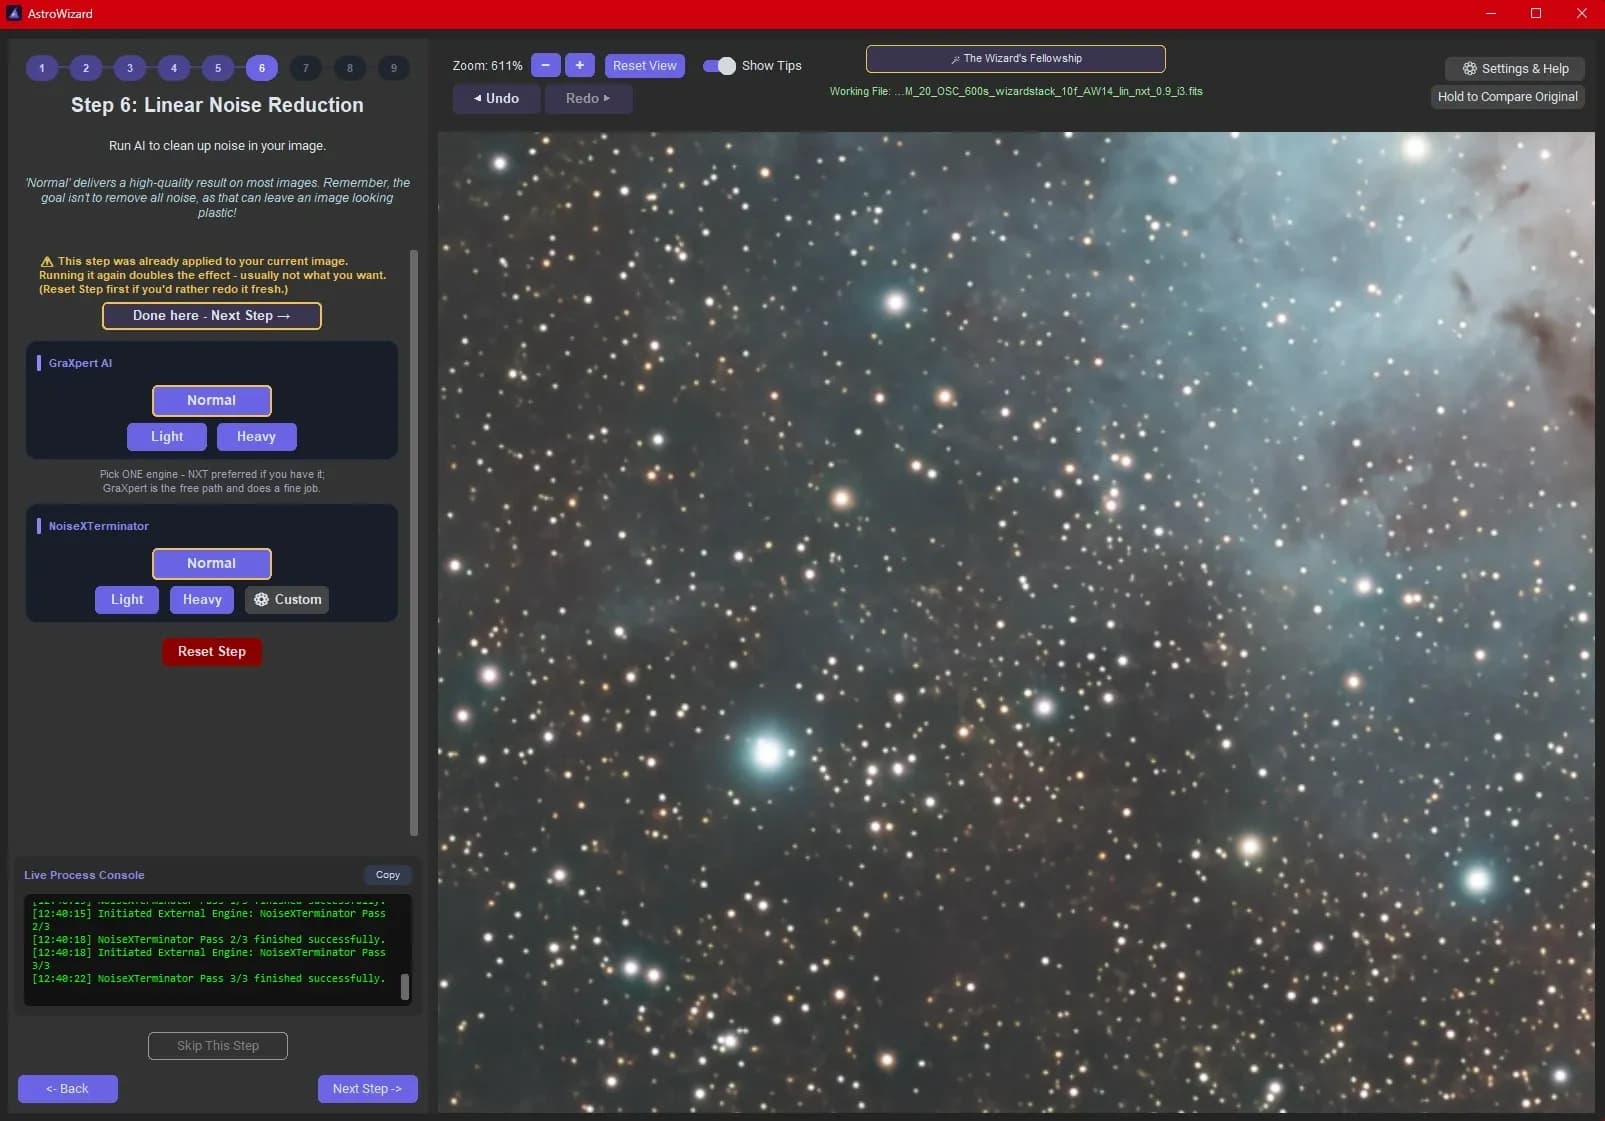
Even after stacking, some noise remains: a coloured grain, most visible in the sky background and dark areas. This step reduces it, still before stretching, when it's most effective.
Same principle as the previous step: two tools, and you only use one:
- GraXpert AI, free, the same tool as in step 3. Three strengths: Light, Normal and Heavy.
- NoiseXTerminator, RC-Astro's paid tool, with the same strengths plus a Custom mode. AstroWizard recommends it if you have it, but says GraXpert does a fine job.
Normal gives a good result on most images. And a piece of advice the tool itself gives: the goal isn't to remove all the noise. Pushed too far, noise reduction gives a smooth, artificial image, often called "plastic". Better to keep a slight grain.
I tried both on Normal. Here's the comparison, heavily zoomed on a patch of sky background at the edge of the nebula, where noise shows most.
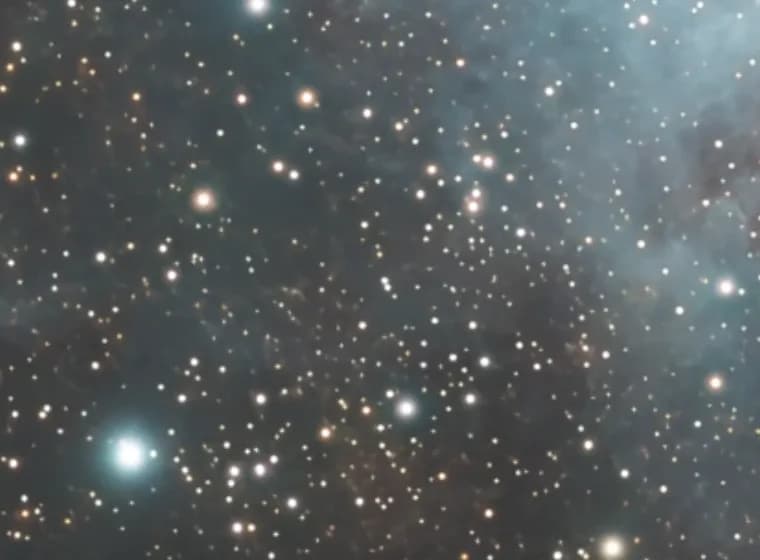
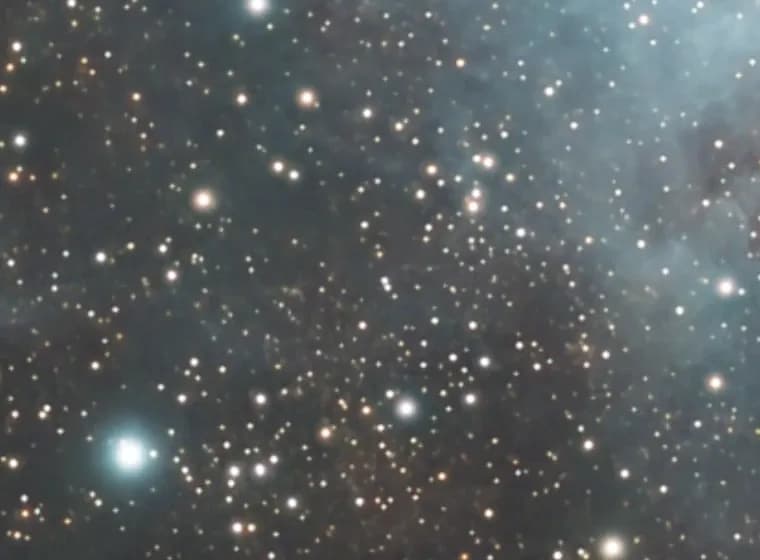
Both do a clean job. NoiseXTerminator smooths the background a little better while keeping the subtle shades of the nebulosity, GraXpert leaves a slightly more visible grain. On the whole image, without zoom, the gap is small.
Speed is another story: NoiseXTerminator is much faster than GraXpert. But even GraXpert finishes in under a minute on this image: nothing to put you off.
I kept NoiseXTerminator for the rest. But once again, with the free GraXpert you already get a very nice result.
Step 7: The Big Stretch, the image comes to life
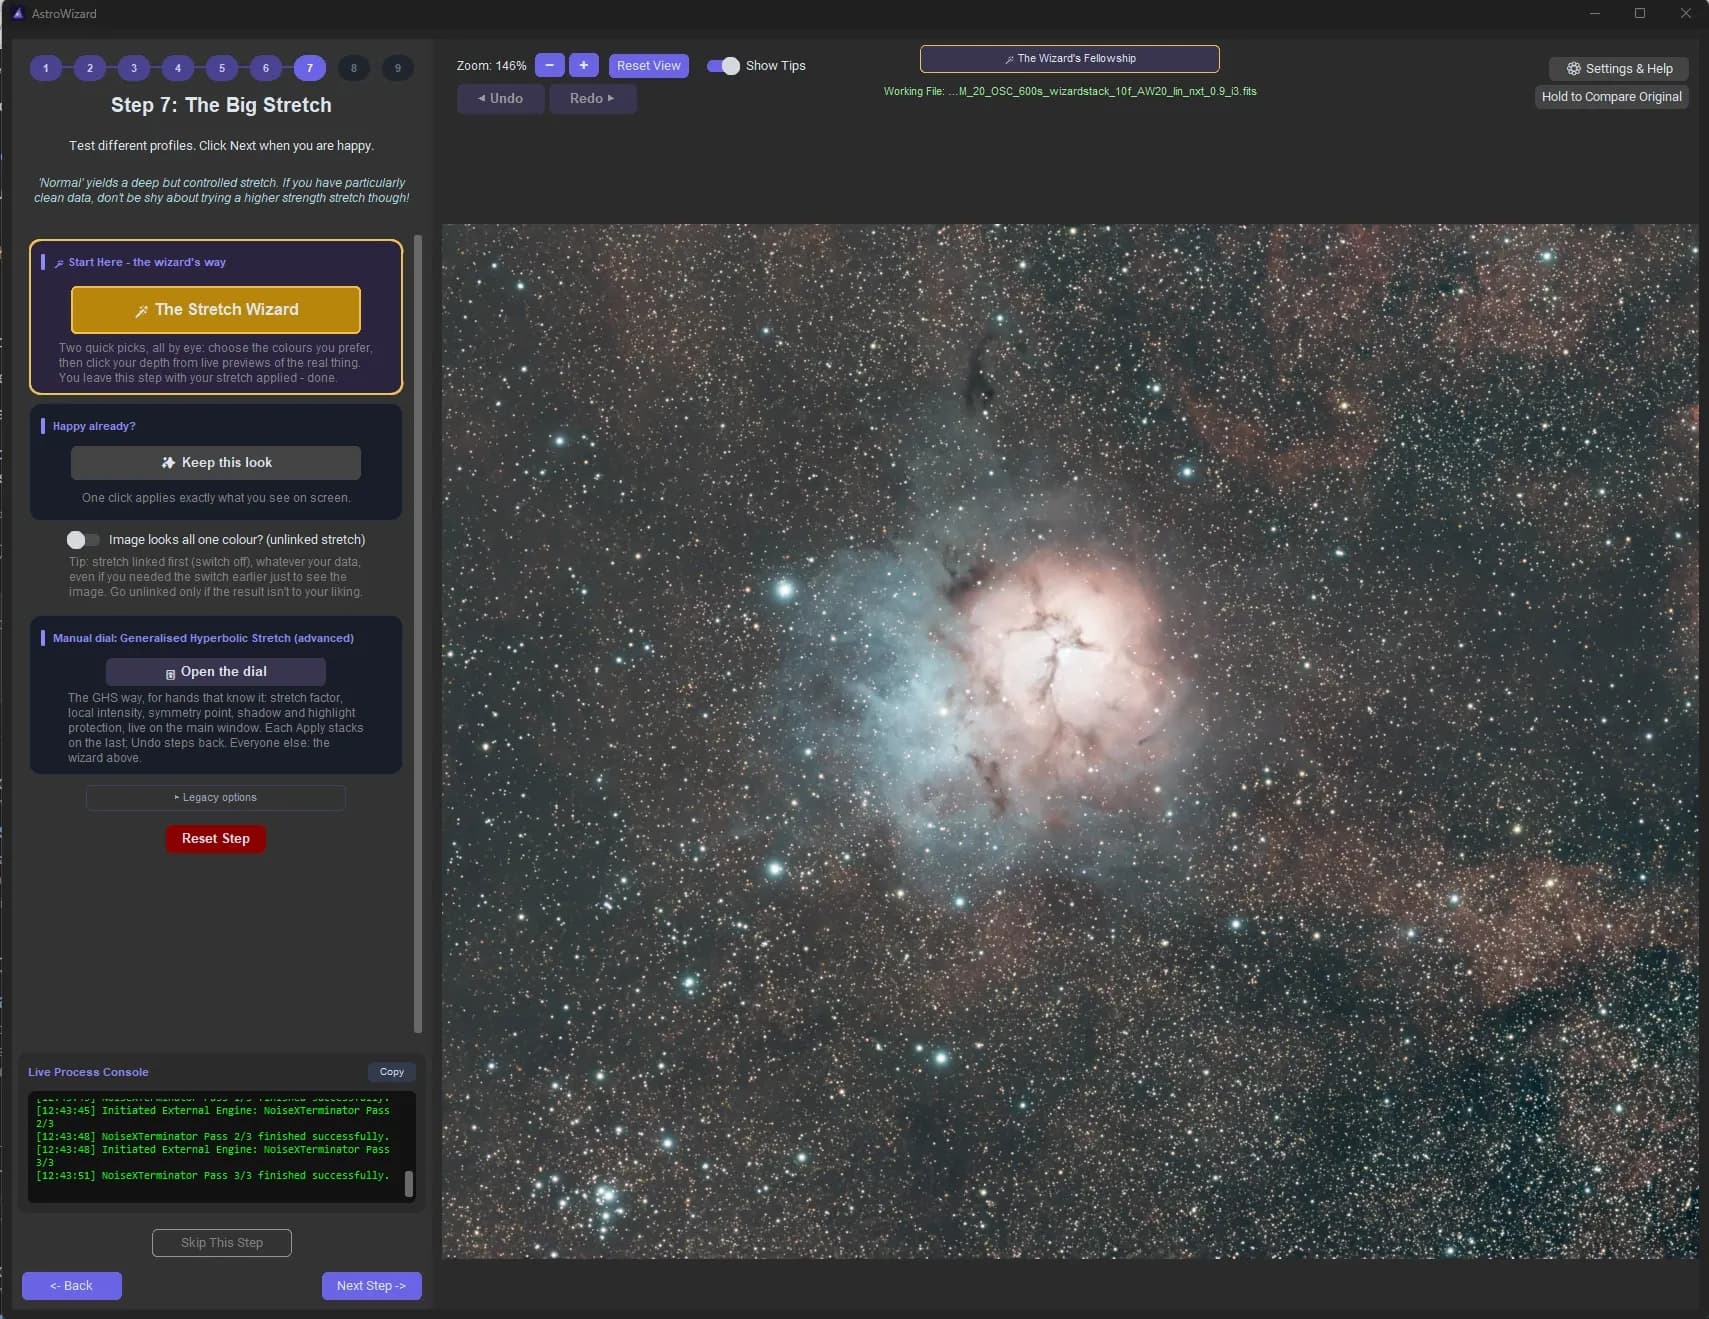
This is the most spectacular step. Until now, we've been working on a "linear" image: straight out of the sensor, it's almost entirely black, and what we saw on screen was only an automatically brightened preview. Stretching brightens the image for real. The whole challenge is to bring out the faint parts of the nebula without burning its core or turning the sky background into grey mush.
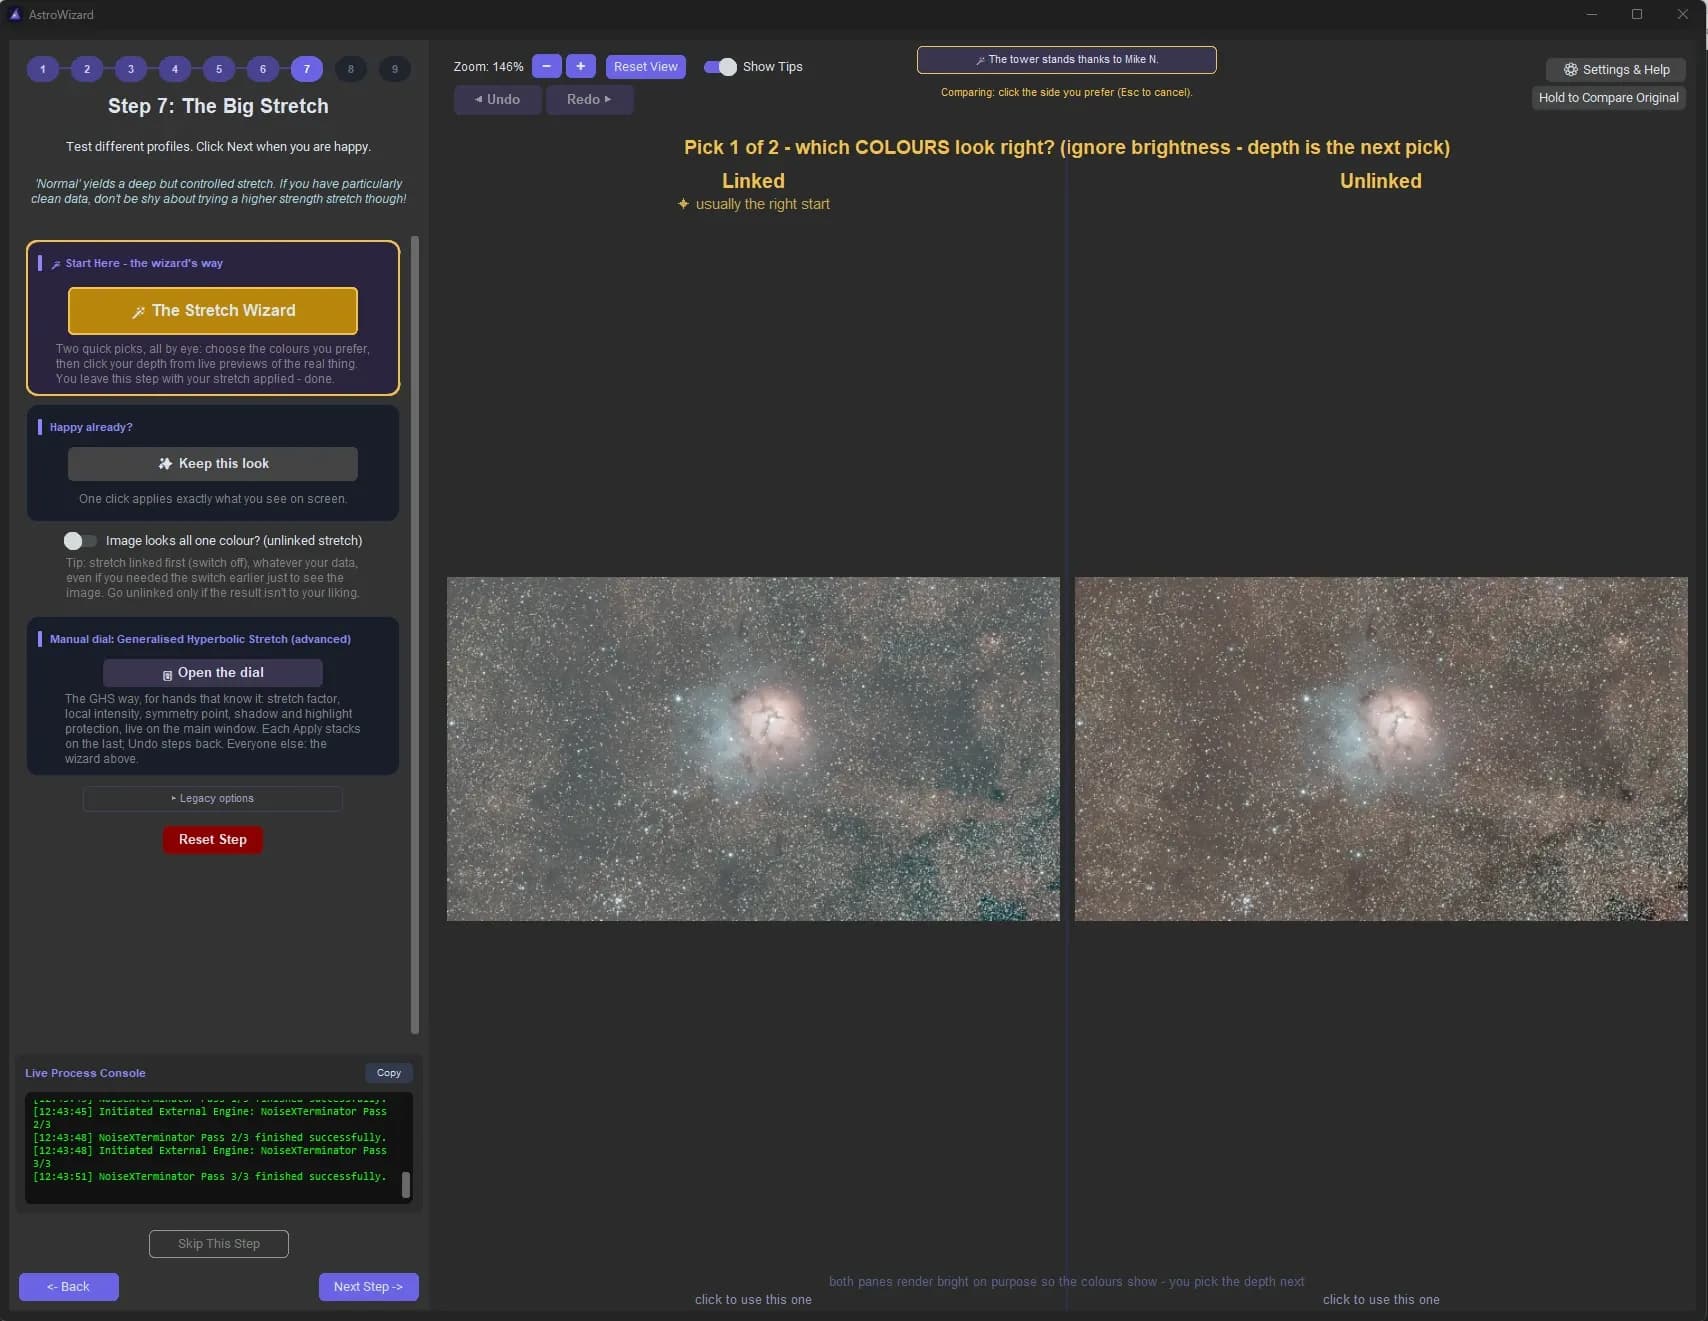
The good news: AstroWizard makes this very simple with The Stretch Wizard, the big gold button. Two choices, both made by eye, on real previews of your image.
First choice: colours. The screen splits into two versions side by side, Linked and Unlinked. In Linked, the three colours are stretched together, which keeps the balance from step 4. In Unlinked, each colour is stretched separately, like the switch in step 1. Both previews are deliberately very bright so you can judge the colours: don't worry about brightness at this point. The tool says Linked is "usually the right start", and that's what I picked.
Second choice: depth. AstroWizard then shows six versions of your image, stretched more or less strongly. You can zoom into each one to compare a specific area. Just click the one you like. I took Deep with Linked colours: it's a matter of taste, there's no wrong answer. The stronger the stretch, the more the faint parts come out, but the more the noise and sky background rise too.
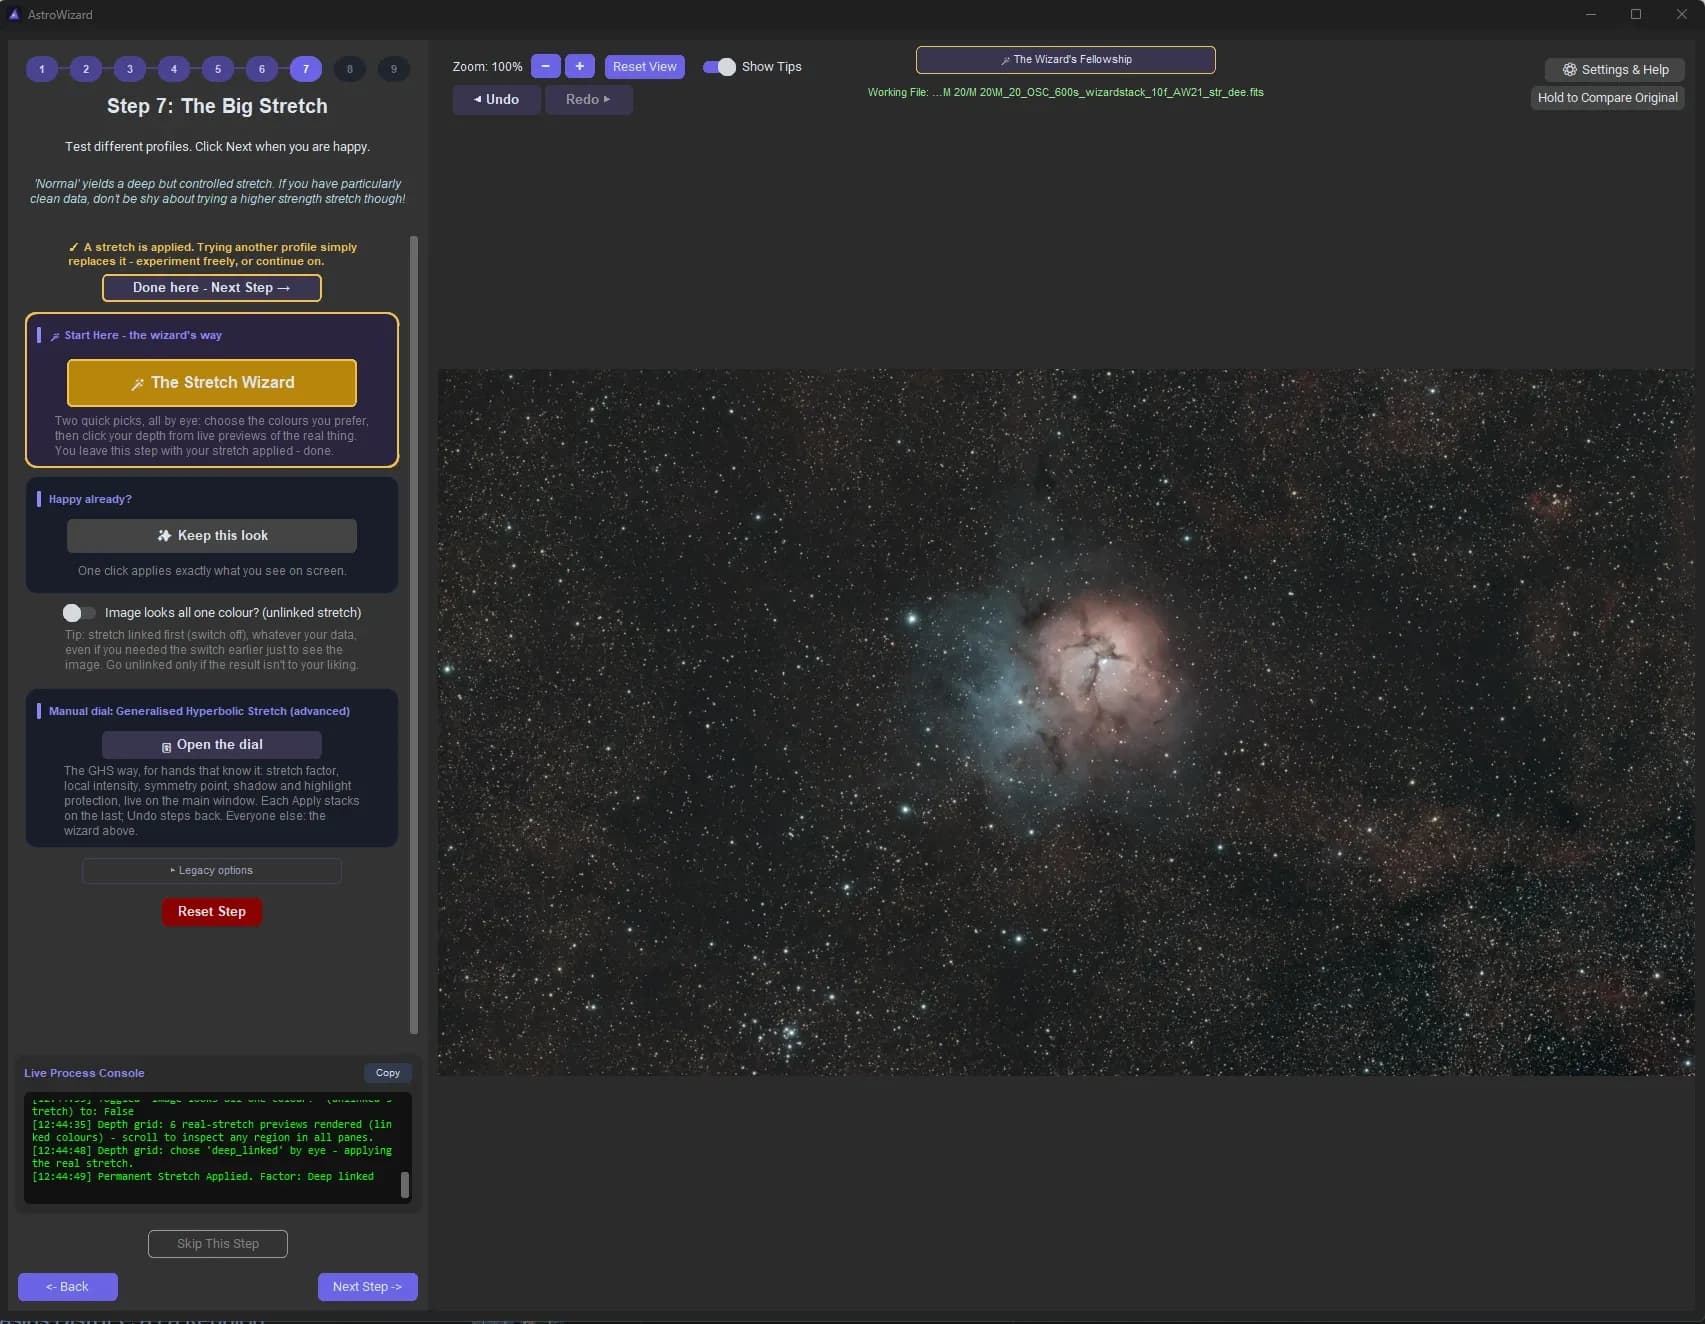
And that's it: you leave the step with the stretch applied. If you don't like the result, just run The Stretch Wizard again, and the new choice replaces the old one.
The other options:
- Keep this look applies exactly the preview on screen, for those who already like it.
- Image looks all one colour? (unlinked stretch): the same switch as in step 1. The tool's advice is clear: try without it first, even if you needed it in step 1 to see anything, and only go Unlinked if you don't like the result.
- Open the dial opens full manual control of the stretch (called GHS). Keep it for later, once you're comfortable with processing: to get started, the Stretch Wizard does the job very well.
Step 8: Final Polish, your personal touch
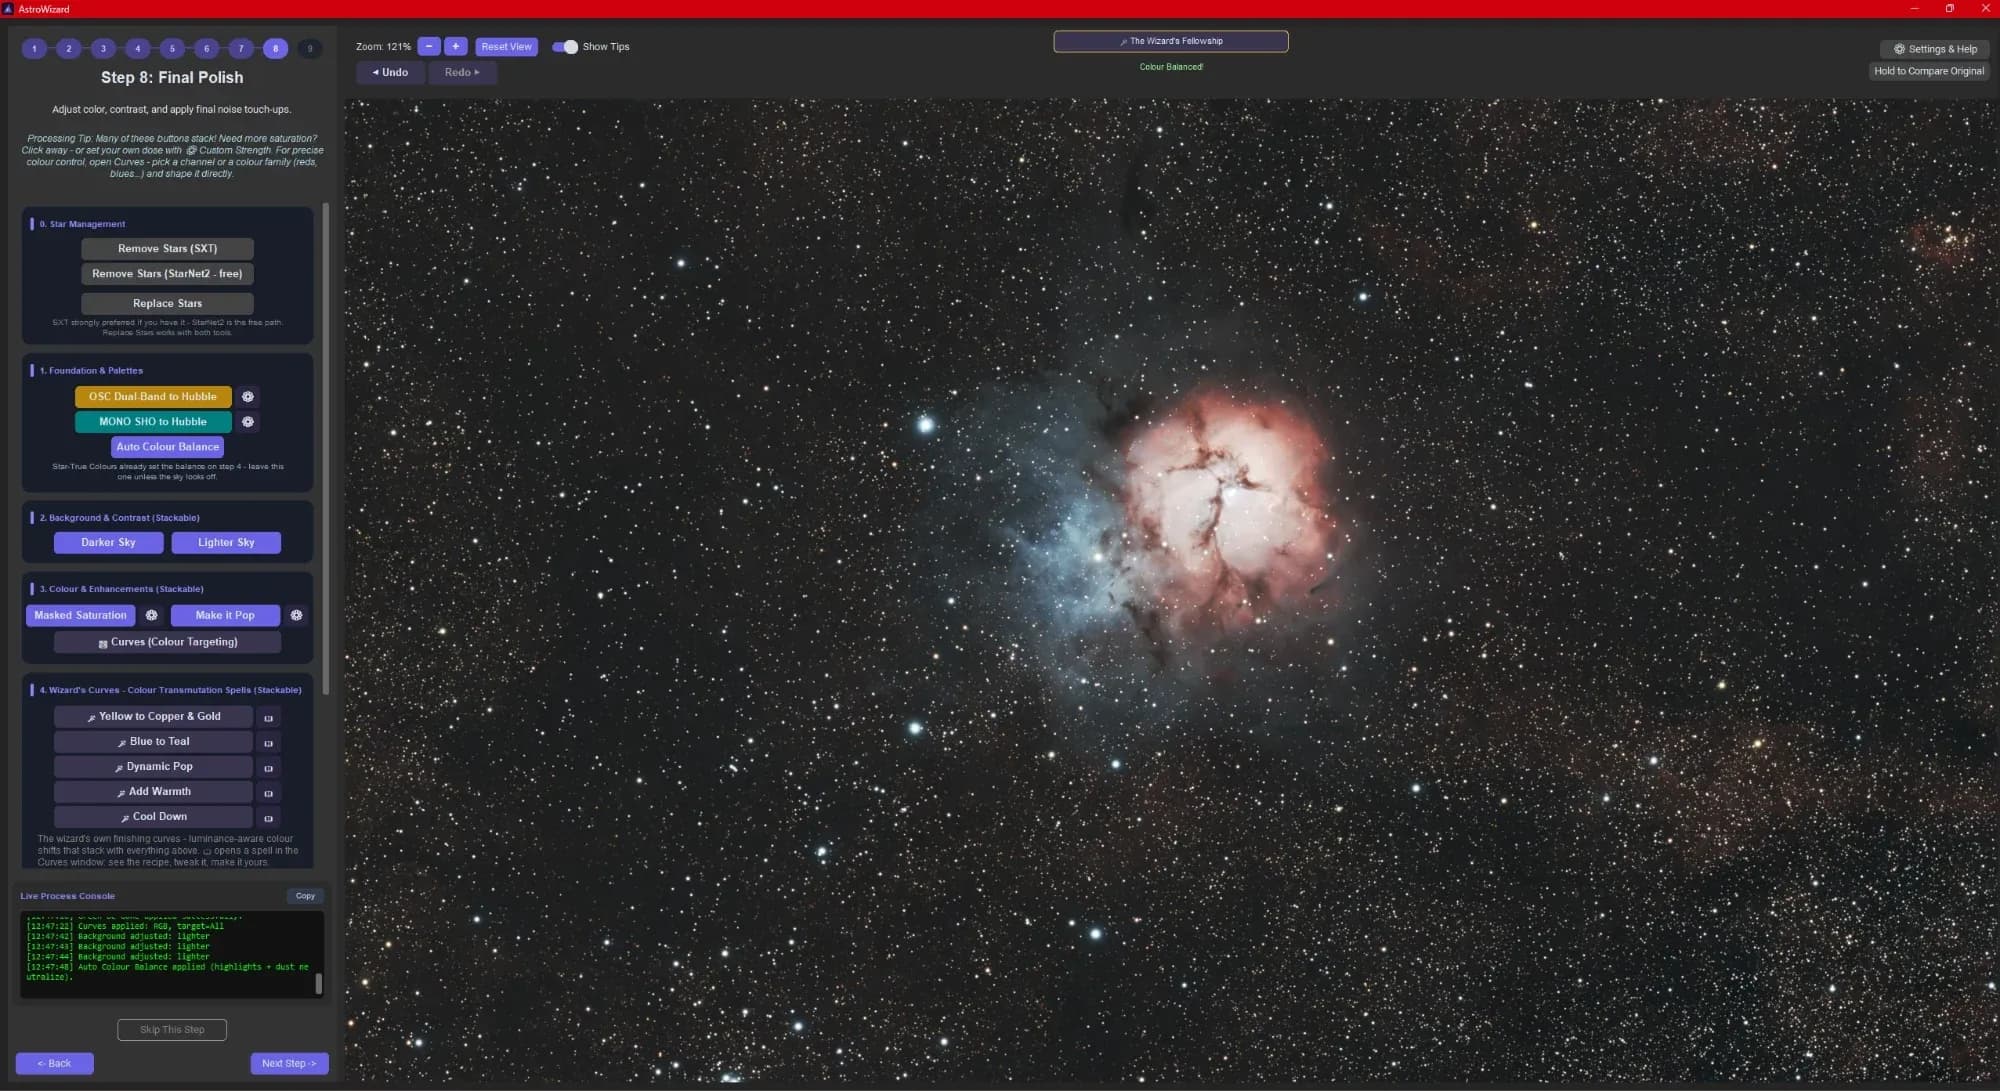
The image already looks good at this point. This step is for adjusting it to your taste: contrast, sky background, colours. Lots of buttons, but none is required. And above all, everything is reversible: Undo cancels the last click, Reset Step puts the image back as it was at the start of the step, and Hold to Compare Original shows the before as long as you hold it. So go ahead, try everything.
Most of these buttons stack: a second click strengthens the effect. The small gear next to some of them lets you choose the strength yourself.
Here's what each box offers:
- Star Management: a very handy option that's worth a closer look. Remove Stars temporarily removes all the stars from the image. You can then work on the nebula and the sky background alone: boost colours, contrast or brighten the background without the stars growing, saturating or changing colour along the way. Once you're done, Replace Stars puts them back, untouched. Two tools to choose from: StarXTerminator (paid) or StarNet2, free, which already does a very good job.
- Foundation & Palettes: colour palettes for images shot with filters. OSC Dual-Band to Hubble turns a dual-band image into a Hubble palette. Auto Colour Balance rebalances the colours, but the tool itself says it's unnecessary if star calibration was done in step 4, unless the sky background still looks tinted.
- Background & Contrast: Darker Sky darkens the sky background, Lighter Sky brightens it.
- Colour & Enhancements: Masked Saturation boosts the nebula's colours without touching the sky background, Make it Pop adds depth, and Curves allows precise adjustment, colour by colour.
- Wizard's Curves: five one-click colour recipes by Lukomatico. Yellow to Copper & Gold (warms yellows towards copper), Blue to Teal, Dynamic Pop, Add Warmth and Cool Down. The small book icon opens the recipe in Curves, so you can see what it does and tweak it.
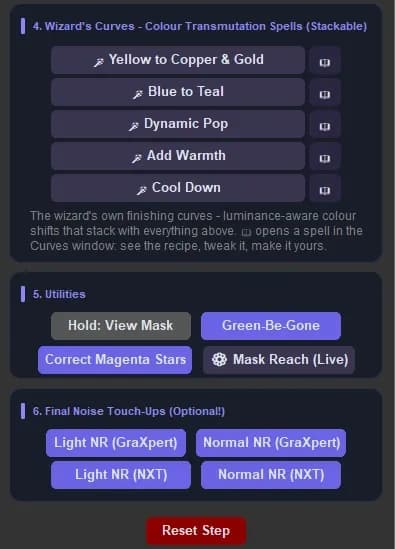
- Utilities: Green-Be-Gone removes the green tint that often shows up in astrophotography, Correct Magenta Stars fixes pink or purple-tinted stars. Hold: View Mask and Mask Reach show and adjust the area the "masked" tools act on, meaning the nebula rather than the sky background.
- Final Noise Touch-Ups: a last light or normal noise reduction, with GraXpert (free) or NoiseXTerminator. Optional, only if noise crept back up with the previous adjustments.
The idea is to keep it simple and quick. On M 20, I used only a few buttons: Dynamic Pop to give the nebula depth and sparkle, Lighter Sky three times in a row to brighten the sky background, which I found too black after the Deep stretch, then Green-Be-Gone and Auto Colour Balance to remove a slight green tint and get the background properly neutral.
These are personal choices. Someone else might have darkened the background, added saturation or tried another recipe. There's no right answer: it's your image, so test, compare, and keep what you like.
Step 9: Final Export, save and share
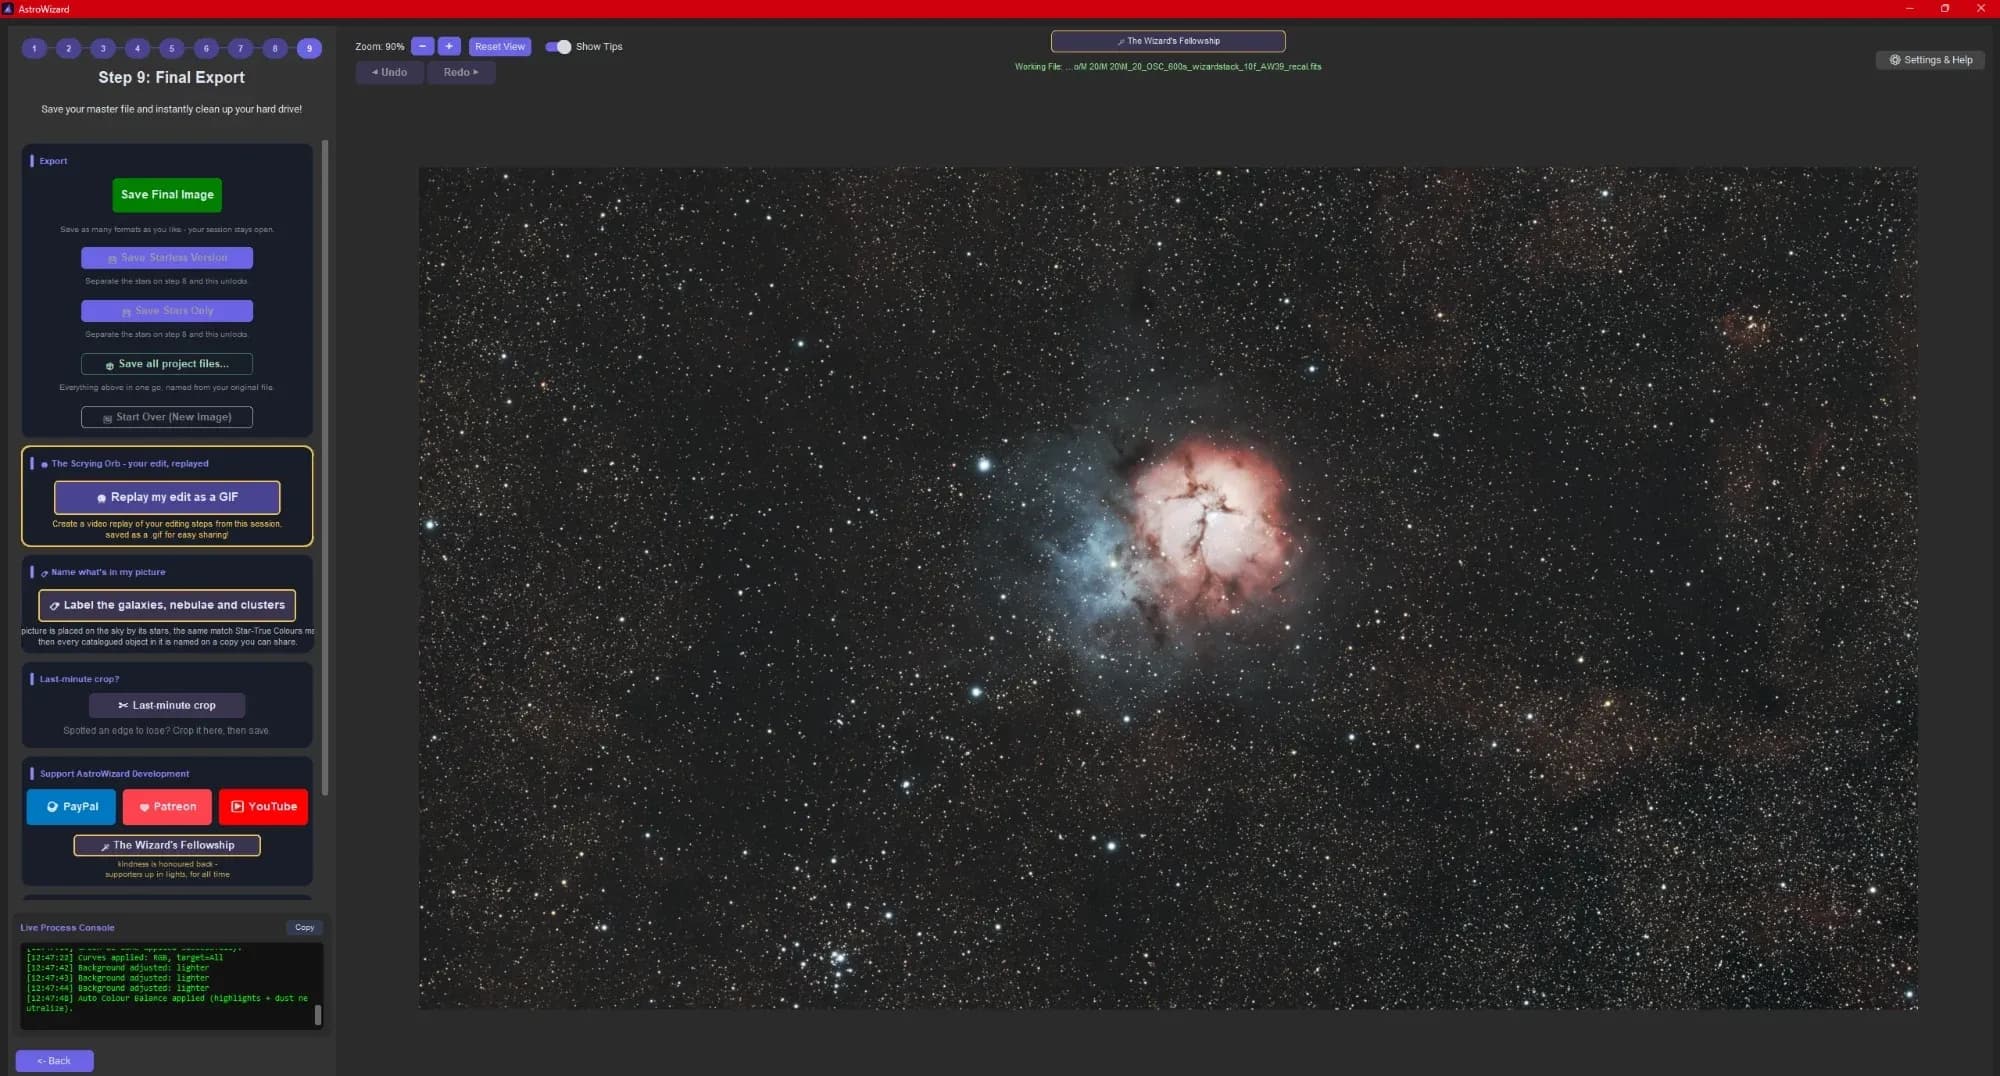
Last step: saving the result. And AstroWizard offers more options than you'd expect.
Save your image
- Save Final Image saves the final image. You can save it in as many formats as you like, the session stays open: a JPEG for social media, a TIFF or FITS to keep a maximum-quality version or continue processing elsewhere.
- Save Starless Version and Save Stars Only save the image without stars, or the stars alone. These buttons only unlock if you removed the stars in step 8. Handy if you want to make a composite or rework the nebula in other software.
- Save all project files saves everything in one go, named after your original file.
- Start Over (New Image) starts from scratch with a new image.
Replay your edit as a GIF
This is the option I like best. Replay my edit as a GIF creates a short animation that replays every processing step, from the raw image to the final one. A GIF ready to share, perfect for showing the whole journey since stacking on social media or a forum.
Name what's in your picture
Label the galaxies, nebulae and clusters locates your image on the sky from its stars (the same recognition as for the colours in step 4) and writes the name of every known object in the field: nebulae, galaxies, clusters. The result is an annotated copy to share, and your original image is not changed. Great for discovering what's hiding around your main target.
And more
- Last-minute crop: an edge bothering you at the last moment? Crop here, then save.
- Support AstroWizard Development: PayPal, Patreon and YouTube links to support Lukomatico. The tool is free, and this kind of support helps keep it that way. The Wizard's Fellowship shows the list of people who support the project.
How long in total?
Taking the time to go through each step, and not counting the first-launch setup (installing GraXpert or the RC-Astro tools and linking them to AstroWizard), M 20 was processed in well under ten minutes. For a complete workflow, from the sky background to the finishing touches, that's remarkable.
The result
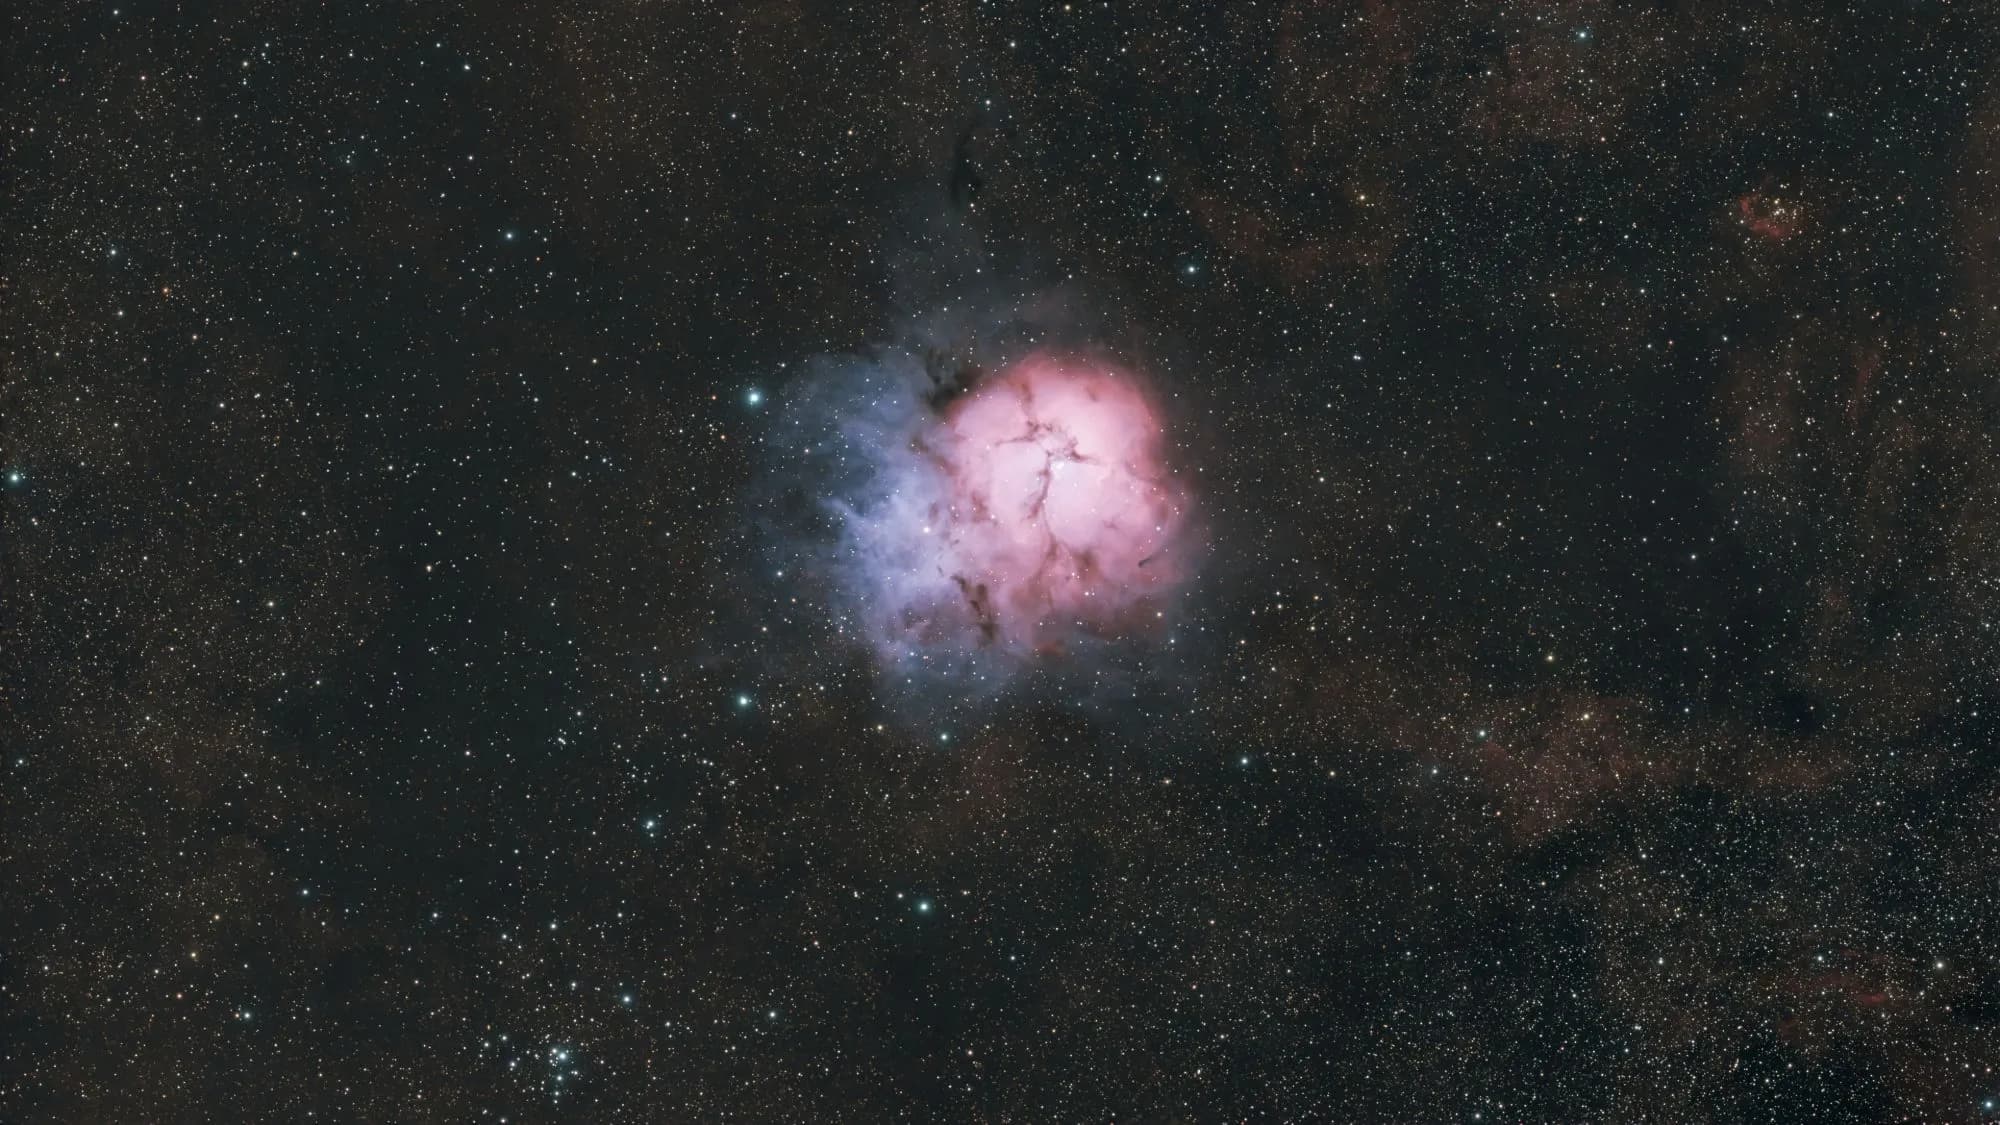
Here's M 20 straight out of AstroWizard. Compared with the raw stack we started from, the difference is clear: the sky background is clean and neutral, the nebula's colours stand out, with the red of hydrogen on one side and the blue of the part reflecting starlight on the other, and the dark lanes that give it its name are well defined. The fainter red nebulosity around the target shows up too.
My verdict
AstroWizard keeps its promise: it makes processing accessible. Nine steps in the right order, a gold trail showing what to click, and a way back at any moment. You never wonder "what do I do now?".
What I liked:
- The defaults. Leaving everything at its default and following the gold trail already gives a very good image.
- The set order. It's the tool's real strength. Beginners rarely get lost because the tools are complicated, but because they don't know which ones to use, or when.
- Choosing by eye. For the stretch, you compare real previews and click the one you like. No need to understand curves or histograms.
- Colour calibration from the stars. Measured colours, not guesswork, in one click.
- Everything is reversible. You can try anything without risk.
- The free tools are enough. GraXpert and StarNet2, both free, already give a very nice result. The RC-Astro tools add something, especially on stars, but they're not essential.
- Speed. Under ten minutes for a complete workflow.
- The extras. The GIF replaying the edit and the automatic object labels, two options you don't find everywhere.
- It's free, on Windows, macOS and Linux.
What could be better:
- A few slightly obscure options. The defaults do a very good job, but some buttons, especially in step 8, stay a bit unclear until you've tried them. Luckily, everything is reversible.
- Working files. At each step, AstroWizard creates working files next to your image, and they aren't deleted after export. After a few sessions they take up disk space, so remember to clean up the folder.
- Highlights in the GIF. The GIF export is a great idea, but very bright areas, like the core of the nebula, don't come out well. That's probably a limit of the format itself, which only handles 256 colours.
- The first-launch setup. Installing GraXpert, opening it once, linking it to AstroWizard: nothing complicated, but a step not to forget.
- The interface is English only.
- It's a beta. The tool evolves very quickly, and some screens in this article may already have changed by the time you read it.
Who is it for? Anyone starting out with processing, and especially smart telescope owners who want to go further than the app's image. With StackingWizard upstream, there's now a complete, free chain, from a night of frames to the final image, without ever getting lost.
All in all, AstroWizard is a real success, and I enjoyed it a lot. The small flaws weigh little against what it brings: a complete, clean and fast workflow that anyone can use. I'll keep using it, and I'll come back to it as updates arrive.
Where to download it
AstroWizard is free and available on Lukomatico's site: astrowizard.lukomatico.com. You'll also find StackingWizard there, a PDF guide written by the community (in English and German) and the changelog.
The AI tools are downloaded separately:
- GraXpert (free): graxpert.com
- StarNet2 (free): starnetastro.com
- RC-Astro (BlurXTerminator, NoiseXTerminator, StarXTerminator, paid with a trial): rc-astro.com
And if the tool is useful to you, consider supporting Lukomatico via PayPal or Patreon, from the app or the website.
Frequently asked questions
Is AstroWizard free?
Yes, entirely. Lukomatico develops it as a spare-time project and accepts donations via PayPal or Patreon. Only the optional RC-Astro tools are paid.
Which systems does it run on?
Windows 10 and 11, macOS (Apple Silicon and Intel) and Linux. It doesn't need a powerful computer: the AI steps are faster with a good graphics card, but they also run on a regular processor.
Which files can I open?
An already stacked image, in FITS, TIFF or XISF, whatever the stacking software: StackingWizard, Siril, DeepSkyStacker, PixInsight, or files from a Seestar or a Dwarf.
Do I need to buy the RC-Astro tools?
No. GraXpert and StarNet2, both free, cover the same steps and already give a very nice result. The RC-Astro tools are faster and a little finer, especially on stars, but they remain a bonus.
How long does it take to process an image?
On M 20, under ten minutes taking the time to go through each step, not counting the first-launch setup.
Gear mentioned in this article
- Askar 71F refractor: my main refractor, the one used for M 20. See it on Astroshop or at HighPoint (US)
- ZWO ASI 585MC Pro camera: a cooled colour camera, very versatile for deep sky. See it on Astroshop or at HighPoint (US)
- Seestar S50: the most widespread smart telescope, and the first one I used. See it at ZWO
To compare the smart telescopes on the market and see what each one frames on your targets, I've gathered their specs in a full comparison and a field of view calculator.
These are affiliate links: if you buy after clicking, I earn a small commission at no extra cost to you. It's what lets me keep testing tools and writing articles like this one. Thanks for your support.