When you start out in astrophotography, one step is scarier than the others: stacking. On paper, the idea is simple. You add up dozens of frames of the same target to bring out the signal and push back the noise. In practice, that's often where things get complicated.
You have to sort your files into the right folders, understand what darks, flats and bias frames are, pick a rejection method, weed out the bad frames, set up the alignment... Classic software does the job very well, but it expects you to already know what you're doing. The result: a lot of beginners get stuck before they've even seen their first clean image.
That's exactly the problem Lukomatico set out to solve with StackingWizard. You give it the folder from your night, and it takes care of sorting, grading each frame, aligning and stacking. Once the stack is done, it sends the result in one click to AstroWizard, his processing tool, which also makes the next steps a lot easier. And on top of that, it can also assemble mosaics.
The tool is free, available on Windows, macOS and Linux, and still in public beta. Here's a first step-by-step look, using a night on M 20 (the Trifid Nebula) shot with my usual setup: an Askar 71F refractor and a ZWO ASI 585MC Pro camera.
Download StackingWizard: it's free, on Lukomatico's website, astrowizard.lukomatico.com/stackingwizard.html. Pick the Windows, macOS or Linux version, then install it like any other software.
A note on my method: I first test each piece of software on my M 20 files, shot through a refractor. There are fewer of them than after a night with a smart telescope, but each frame is heavier: about 4 times more pixels than a Seestar S50 frame. The goal is mainly to judge how comfortable the processing is. Speed mostly matters at the stacking stage, when hundreds of frames have to be digested.
Step 1: The Pile, hand over the whole night
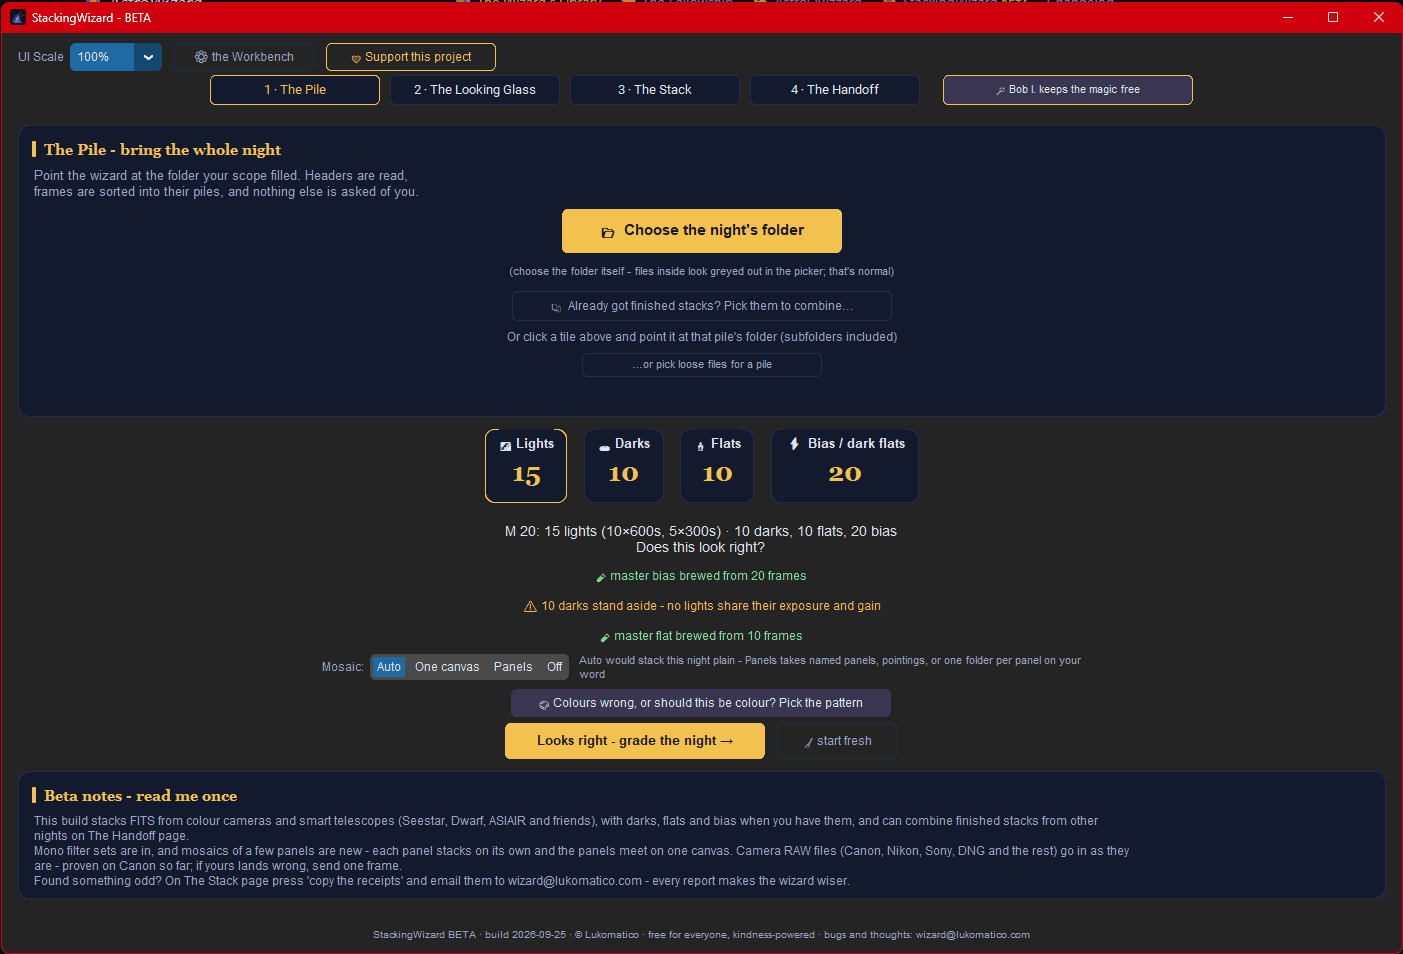
It all starts with a single button: Choose the night's folder. You point it at the folder holding your FITS files, and that's it. One small catch: you need to select the folder itself, so the files show up greyed out in the picker. That's normal.
StackingWizard then reads the information stored in each file (exposure time, gain, temperature, frame type) and sorts every file into the right pile on its own: lights (your actual photos of the target), darks, flats and bias. It then shows you a summary and simply asks whether it looks right. Here: 15 lights (10 at 600 s and 5 at 300 s), 10 darks, 10 flats and 20 bias.
An important point if you're a beginner: don't worry if all you have are lights. With most smart telescopes, darks are already handled by the device: the Seestar S50 applies a dark directly to every image, and the Dwarf 3 takes its own darks. And if your gear doesn't give you any, that's perfectly fine for a first try. Flats and bias will get their own article: if you have them, great, StackingWizard uses them. If not, you don't need them to get started.
You can also see that the tool doesn't just do anything with the files you give it. Here, it builds a master bias from the 20 bias frames and a master flat from the 10 flats, but it sets the 10 darks aside with a warning: none of the lights share their exposure time and gain. Rather than applying darks that don't match (and would degrade the image), it prefers to ignore them and tell you. Exactly the kind of mistake a beginner makes without noticing in classic software.
The other options on this screen:
- Already got finished stacks?: if you already have finished stacks (other nights on the same target, with the same gear), you can select them to combine them.
- Clicking a tile (Lights, Darks, Flats, Bias) lets you point it at a specific folder manually, subfolders included, or pick files by hand with pick loose files for a pile. Handy if your darks or flats are stored elsewhere.
- Mosaic: left on Auto, the tool works out on its own whether it's a regular night or a mosaic. One canvas forces everything onto a single canvas, Panels handles named panels (or one folder per panel), Off turns mosaic handling off completely. Here, Auto correctly understood it was a simple night.
- Colours wrong, or should this be colour?: if the colours look odd, or the image shows up in black and white even though your camera is a colour one, this button lets you choose the sensor's colour pattern (such as RGGB). In the vast majority of cases, this is read automatically and you won't need to touch it.
- Start fresh starts over from scratch, and UI Scale at the top left lets you enlarge the interface if it feels too small.
The beta notes at the bottom of the screen also mention that camera RAW files (Canon, Nikon, Sony, DNG...) are accepted as they are, tested on Canon so far. Good news for anyone starting out with a DSLR or mirrorless camera.
If everything looks right, click Looks right - grade the night and move on.
Step 2: The Looking Glass, every frame under the magnifier
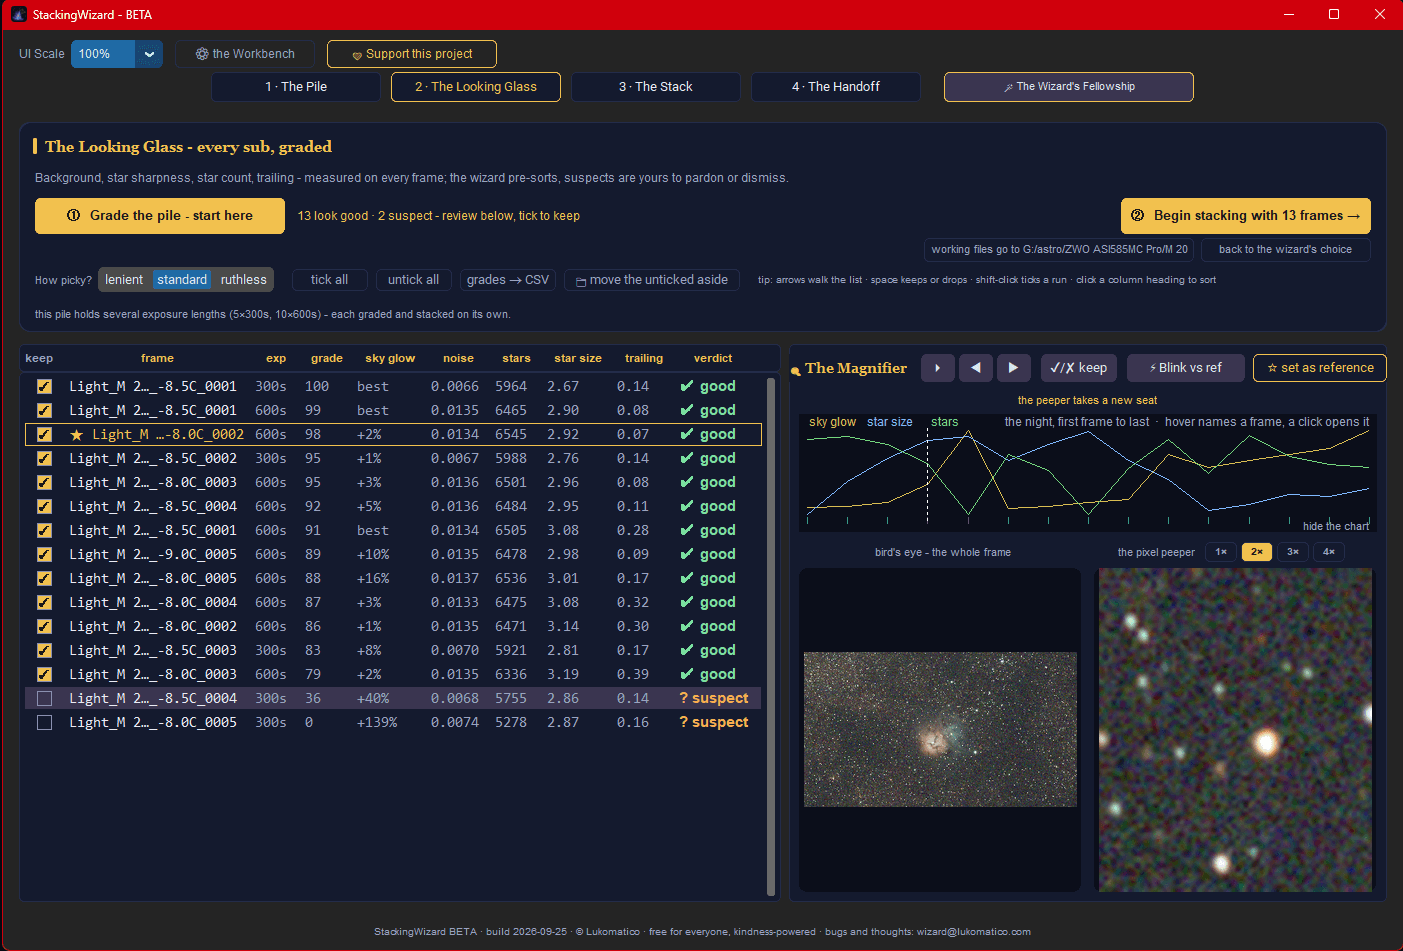
This is the sorting step, the one beginners often rush. Click Grade the pile - start here and StackingWizard analyses every frame one by one: the brightness of the sky background (sky glow), the noise, the number of stars detected, their size (the smaller and tighter they are, the sharper the image) and any trailing caused by imperfect tracking. Each frame gets a score out of 100 and a verdict.
On my M 20 night, the result comes back in a few seconds: 13 frames rated good, 2 suspect. And this is where the tool saves a huge amount of time. With 15 frames, you could still check everything by hand. But with a smart telescope like the Seestar, a single night quickly means hundreds, even thousands of 10 or 20 second frames. Nobody wants to open them one by one. The automatic sorting is already very reliable: in the vast majority of cases, you can trust it and move straight on.
What to do with "suspect" frames?
Frames marked suspect are unticked by default: they won't be used in the stack unless you decide to bring them back. Here, the two suspect frames have something in common that's easy to spot in the table: a sky background much brighter than the best frame (+40% and +139%). Typically a passing veil of cloud, the Moon rising or the start of dawn. One of them even gets a score of 0.
You have two options:
- Pardon them: if you think they're usable, just tick the "keep" box. Useful when you don't have many frames and every minute of exposure counts.
- Dismiss them: simply leave them unticked. The move the unticked aside button even moves them to a separate folder, so they won't show up in your next attempts.
To decide, click on a row: The Magnifier panel on the right shows the whole frame (bird's eye) and a zoom on the stars (pixel peeper, from 1x to 4x). The small chart above shows how sky glow, star size and star count change over the night: you can immediately spot when a cloud went by. And the Blink vs ref button flicks quickly between the selected frame and the reference image, which makes the differences obvious.
The reference image
In the list, one frame is marked with a star: that's the reference image. It's the model used to align all the others. StackingWizard automatically picks one of the best frames of the night (here, a 600 s frame scored 98). If you'd rather use another one, for example because it's better framed, select it and click set as reference. The back to the wizard's choice button takes you back to the original pick.
The other settings, in short
- How picky? sets how strict the sorting is: lenient, standard (the default) or ruthless. Standard works in most cases.
- tick all / untick all tick or untick everything at once, and grades → CSV exports the scores to a spreadsheet for the curious.
- You can sort the table by clicking the column headings, and navigate with the keyboard (arrows to move through the list, space to keep or drop).
A nice touch: when a night mixes several exposure times (here 5 x 300 s and 10 x 600 s), each group is graded and stacked separately, then combined. There's nothing special for you to do.
Before you start: the working folder
One last thing not to forget before stacking: under the big yellow button, the working files go to... line shows the folder where StackingWizard will save its working files and the final image. By default, it suggests a folder next to your files. Click it to choose another one if needed, and above all make a note of it: that's where you'll find your stack once it's done.
When you're happy with the selection, go to Begin stacking with 13 frames.
Step 3: The Stack, watch the image build up
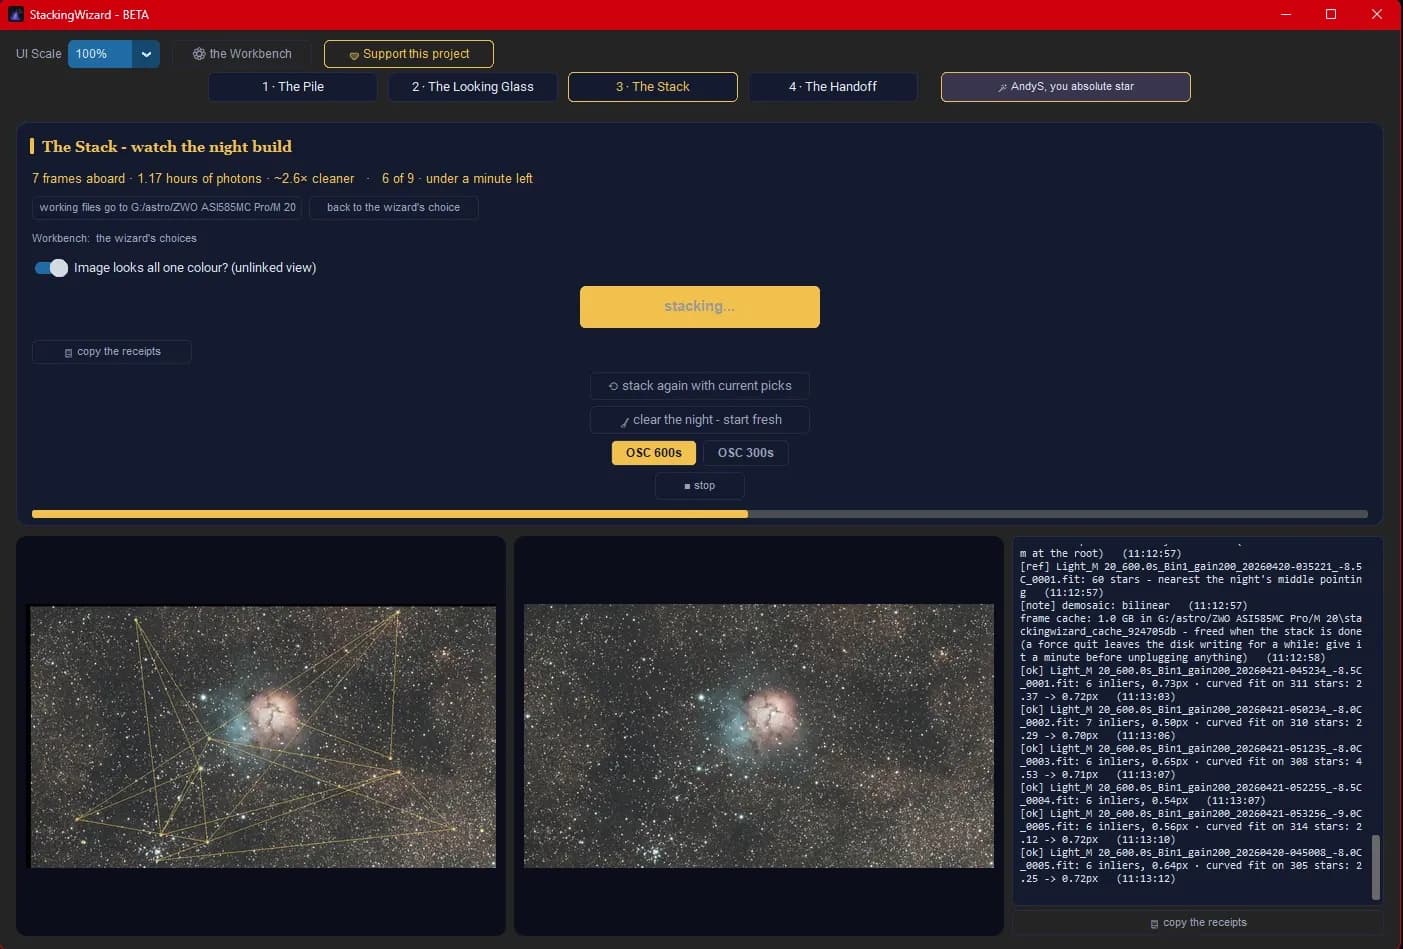
This is probably the most enjoyable step to watch. While it stacks, StackingWizard shows you what it's doing live:
- On the left, the little yellow triangles linking the stars: that's how the tool recognises the same star pattern from one frame to the next so it can line them up perfectly. Even if your framing drifted slightly during the night, it finds its bearings.
- In the middle, the stacked image getting better with every new frame added. You can literally watch the noise fade and the nebula rise out of the background.
- On the right, a detailed log of every operation, for the curious.
At the top, a line sums up the progress in plain language: the number of frames already included, the total exposure time, an estimate of how much cleaner the image has become ("~2.6x cleaner") and the time left.
Reading the log, you also find out that the tool handles some tricky cases by itself. On my night, some frames taken after the meridian flip (when the mount swings over to follow the target on the other side of the sky) didn't line up perfectly because of optical distortion towards the edges of the field. StackingWizard detected it and used a more flexible alignment, the "curved fit", to put them back in place. Without asking anything.
As for speed, I personally find StackingWizard isn't yet the fastest tool around in terms of raw performance. But it's still very reasonable, and this step has always depended as much on the computer's power as on the number and size of the images. On my M 20 night, nothing to complain about.
At this stage, there's nothing else to do but wait. The few buttons available are mainly there to restart (stack again with current picks, for example after changing the frame selection), start over (clear the night - start fresh) or stop the process (stop). The OSC 600s and OSC 300s tabs match the two exposure groups from my night: each one is stacked on its own.
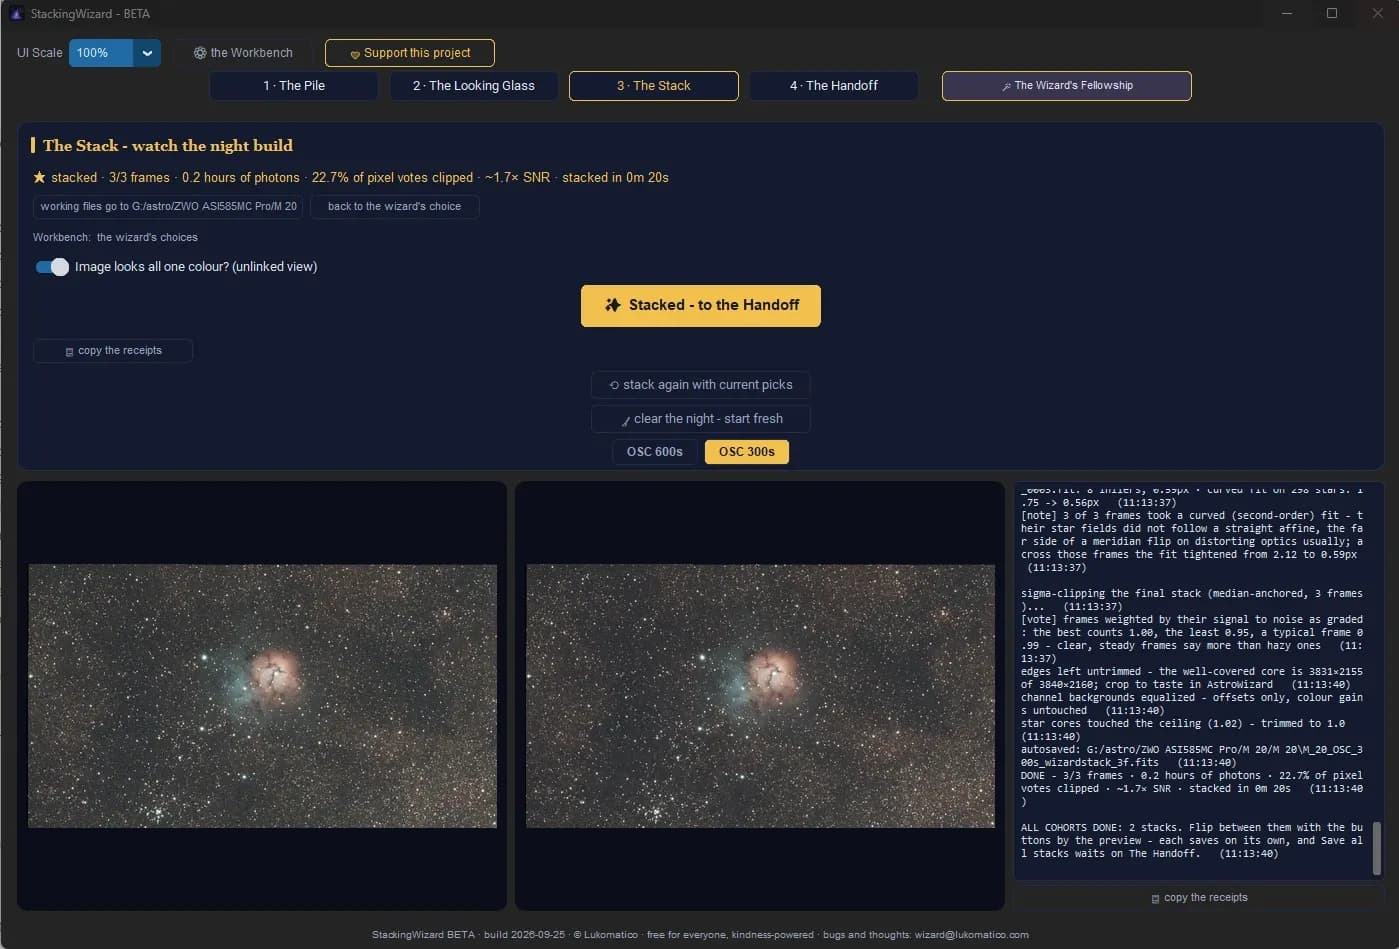
Once it's done, the button changes to Stacked - to the Handoff. The summary shows the number of frames used, the total exposure time, the signal-to-noise improvement and how long the stack took. The stack is already saved automatically as a FITS file in the working folder chosen in the previous step. You can switch between the exposure groups with the tabs to compare the results.
Finally, the copy the receipts button copies the full log. You won't need it day to day, but if a result looks odd, that's what you should send to Lukomatico to help him fix the problem. It's a beta, and every report counts.
Step 4: The Handoff, collect your stack
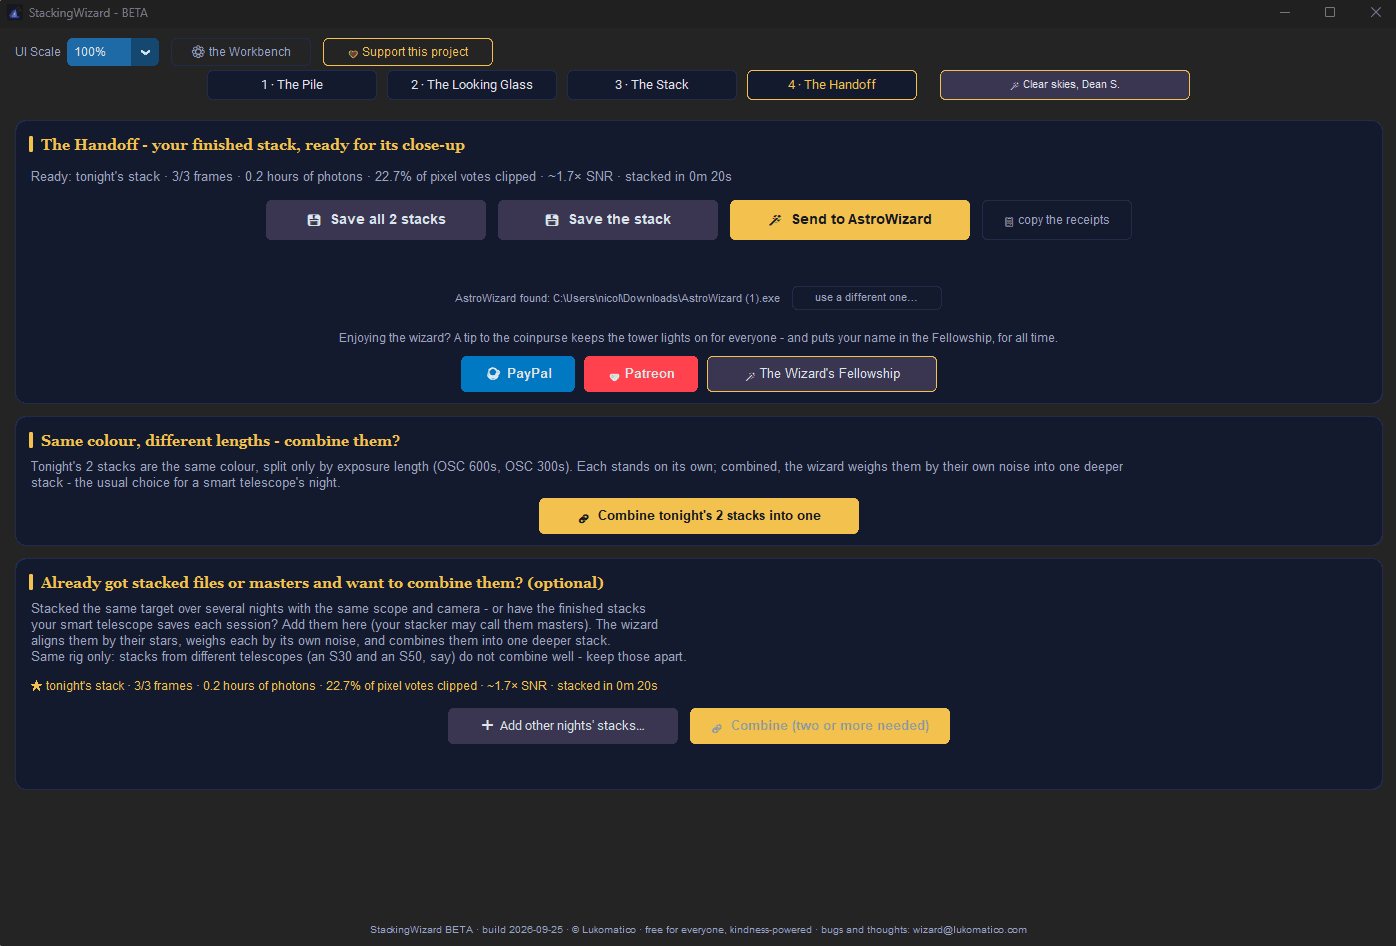
Last screen. The stack is ready, now you decide what to do with it.
Automatically combine different exposure times
The second panel is the one I liked the most. Since my night had both 600 s and 300 s frames, I ended up with two separate stacks. I didn't have to look for anything: StackingWizard noticed on its own that they were the same target with the same gear, and offers to merge them with Combine tonight's 2 stacks into one.
It doesn't just add them together: each stack is weighted according to its own noise level, to produce a single, deeper image. That's typically what you want after a night with a smart telescope. In classic software, you'd have had to do it by hand, and know how.
The third panel goes further: Add other nights' stacks lets you add stacks from other nights on the same target and combine everything. The only condition is to stick with the same gear. Mixing a Seestar S30 and an S50, for example, won't give a good result.
Save or send to AstroWizard
At the top, three buttons:
- Save the stack saves the stack on screen, and Save all 2 stacks saves both groups at once. You get FITS files you can process in the software of your choice (Siril, PixInsight, GraXpert...).
- Send to AstroWizard is the button we're interested in. It opens the stack directly in AstroWizard, Lukomatico's processing tool, without going through your file browser. StackingWizard finds AstroWizard on your computer by itself (use a different one if you have several versions).
What comes next, step-by-step processing in AstroWizard, is covered in a dedicated article.
At the bottom of the screen, PayPal and Patreon links let you support the project. The tool is free and Lukomatico develops it in his spare time: if StackingWizard is useful to you, it's a good way to say thanks.
The result
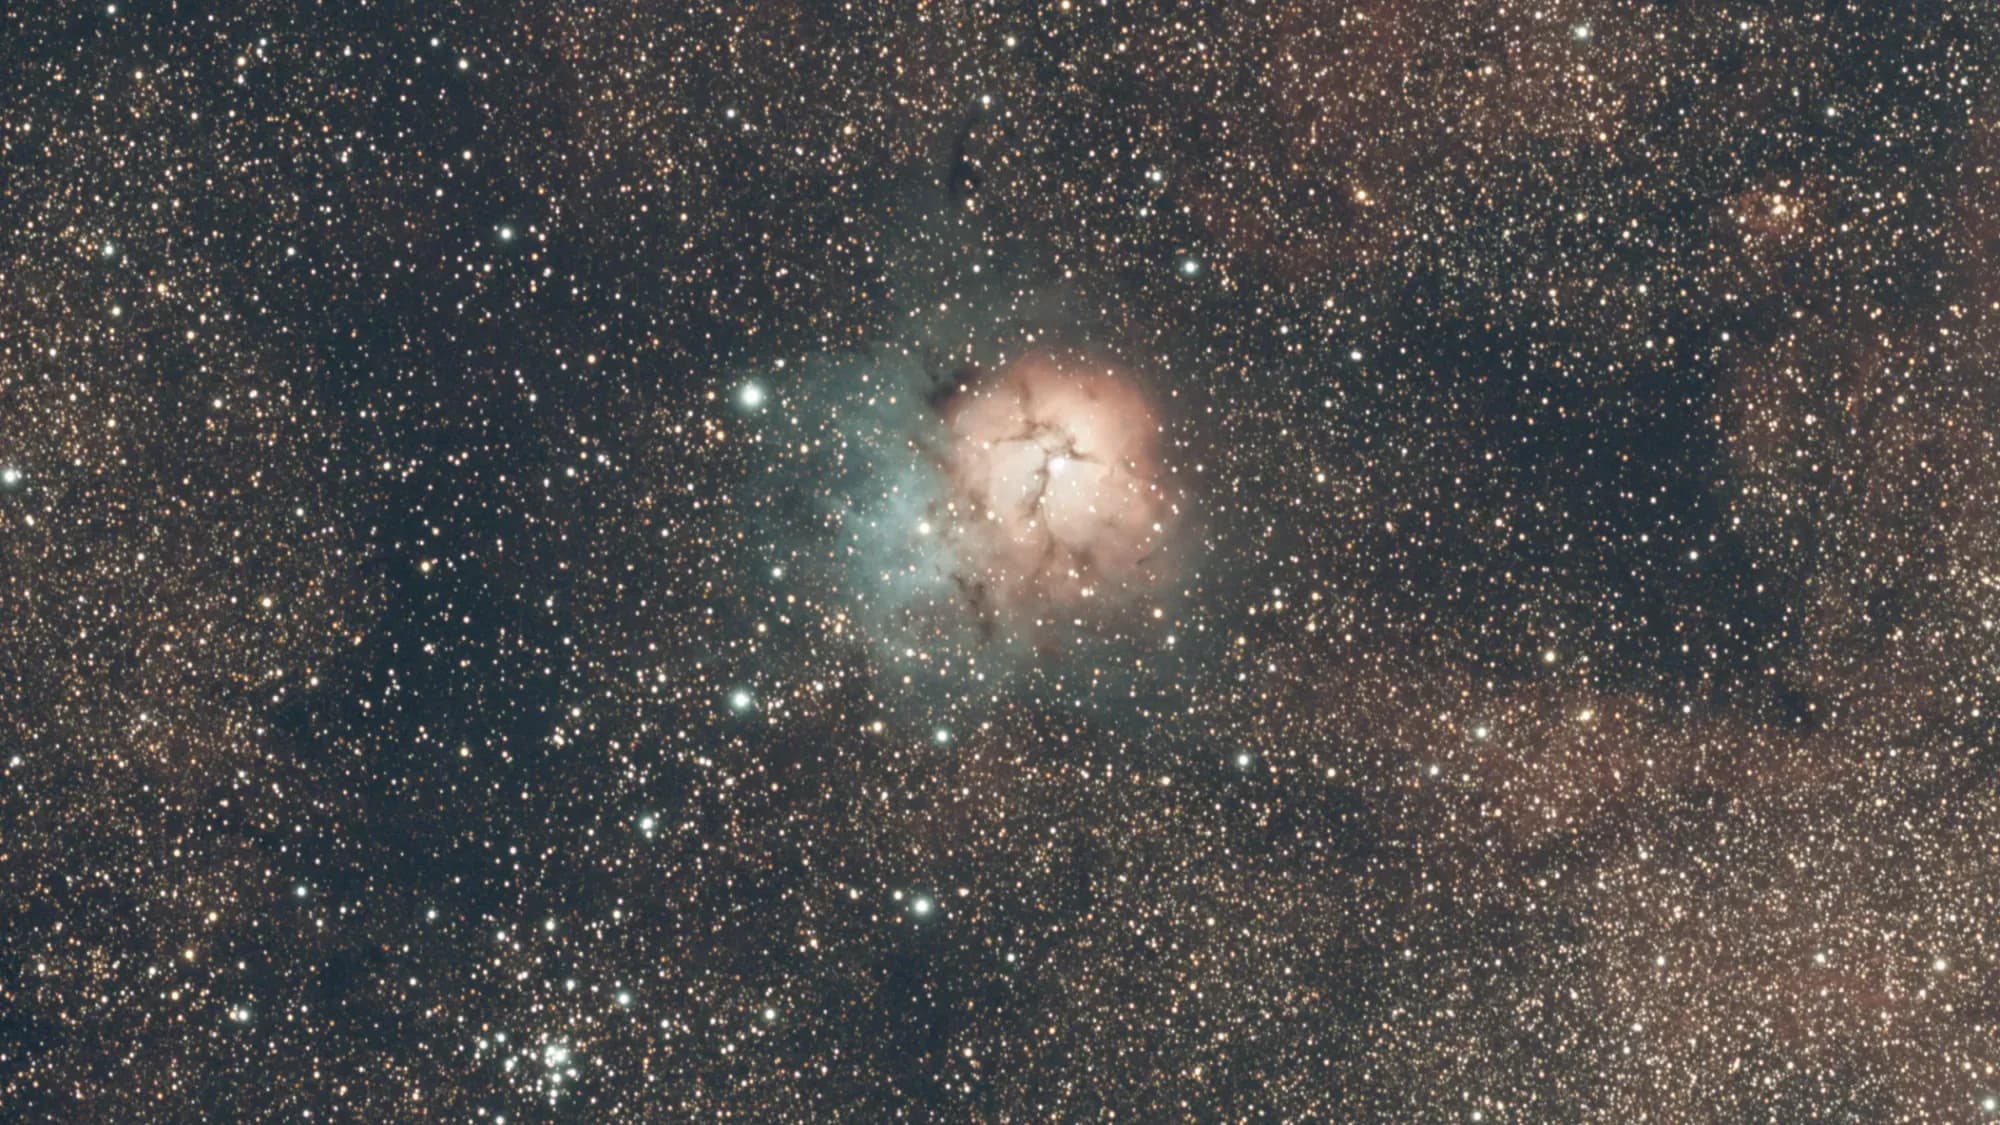
Here's M 20 straight out of StackingWizard, as it opens in AstroWizard. AstroWizard stretches it automatically so you can see it, but no processing has been done yet. The sky background is clean, the stars are tight and round, and the nebula and its dark lanes already stand out clearly. It's a very good starting point for the next steps in AstroWizard.
My verdict on this beta
StackingWizard does what it promises: it makes stacking simple. You give it a folder, check two or three things, wait, and get a clean image back. No need to understand rejection methods or alignment settings to get a good result.
What I liked:
- It's easy to pick up straight away. Four screens, one big yellow button at each step. You don't get lost.
- The automatic sorting. It's reliable, and across hundreds of frames it's a real time saver.
- Sensible defaults. Unsuitable darks set aside, cloudy frames dismissed, two exposure times combined cleanly. That's a lot of beginner mistakes avoided without even knowing it.
- The live preview. You understand what's happening, and it's nice to watch.
- Sending straight to AstroWizard. Going from stacking to processing takes one click.
- It's free, on Windows, macOS and Linux.
What still needs work:
- Speed, which is reasonable but not yet on par with the fastest tools.
- It's a beta. Bugs are possible, and camera RAW files have only been tested on Canon so far.
I haven't tried mosaics in this article yet: they deserve a separate test.
Who is it for? First of all, for beginners who get stuck at the stacking stage, and for every smart telescope owner who wants to go further than the image the app gives them. But even with more experience, it's worth having for the nights when you just want a good result, fast.
For a beta, it's already very polished. I'll keep using it and will come back to it as updates come out.
Where to download it
StackingWizard is free and available on Lukomatico's website: astrowizard.lukomatico.com/stackingwizard.html. You'll also find AstroWizard and a PDF guide there.
To report a bug or make a suggestion, Lukomatico can be reached at wizard@lukomatico.com (remember to attach the log copied with "copy the receipts").
And don't hesitate to make a donation to encourage him, via PayPal or Patreon from the app or his website. Building such useful tools for free fully deserves it.
Frequently asked questions
Is StackingWizard free?
Yes. StackingWizard is free, and so is AstroWizard, the processing tool by the same author. It is still in public beta. Lukomatico develops them as a spare-time project and accepts donations via PayPal or Patreon.
Which systems does it run on?
Windows, macOS and Linux.
Does it work with frames from a Seestar or a Dwarf?
Yes. It reads the FITS frames saved by smart telescopes, just like frames from a regular astro camera. Your telescope's app simply needs to save every individual frame, not only the final image. It also accepts camera RAW files, tested on Canon so far.
Do I need darks, flats and bias frames?
It's better, but not mandatory. Lights alone already give a good stack. If you have darks, flats or bias frames, StackingWizard sorts and uses them on its own, and sets aside the ones that do not match your lights.
How does it compare to Siril?
Siril is free too, more complete and faster, but you have to learn its settings. StackingWizard automates everything: sorting, grading, aligning, stacking and combining exposure times. To get started or to get a good result quickly, StackingWizard is simpler. To keep control over every parameter, Siril remains the reference.
Gear mentioned in this article
- Askar 71F refractor: my main refractor, the one used for M 20. See it on Astroshop or at HighPoint (US)
- ZWO ASI 585MC Pro camera: a cooled colour camera, very versatile for deep sky. See it on Astroshop or at HighPoint (US)
- Seestar S50: the most widespread smart telescope, and the first one I used. See it at ZWO
- Dwarf 3: Dwarflab's compact alternative, with built-in filters. See it on Amazon or at HighPoint (US)
To compare these smart telescopes with every other model on the market, I've gathered their specs in a full comparison.
These are affiliate links: if you buy after clicking, I earn a small commission at no extra cost to you. It's what lets me keep testing tools and writing articles like this one. Thanks for your support.