If you follow the blog, SyQon won't be new to you: I covered Syqon Starless, their AI tool that removes stars from an image. Since then, the team hasn't been idle. They've added a sharpening tool, a noise reduction tool, and above all they've just launched SyQon Studio: complete software that brings all of astro processing together in one place.
Until now, processing an image often meant juggling several programs: one to stack, another to process, AI tools installed on the side. SyQon Studio wants to bring it all together, a bit like going from a scattered toolbox to a tidy workshop.
The software is free, in public beta (version 1.1). Only the most advanced AI models are paid, and they're optional.
An important note: this article is a first discovery run, not a full review. I'll show you what the software contains, then my first try, with what already works very well and where I got lost.
What SyQon Studio does, step by step
SyQon Studio follows the classic path of an astro image, from your raw files to the final photo. Here's each step in plain words.
1. Calibration: cleaning up sensor defects
Before stacking, you correct your gear's own defects with calibration files: darks (frames taken with the cap on, to record the sensor's noise), flats (frames of an even surface, to correct dust and dark corners) and bias (the camera's electronic "background noise"). SyQon Studio handles them all and keeps master files to reuse from one night to the next.
Don't worry if you don't have any: as with other software, you can stack without them.
2. Frame analysis: sorting the good from the bad
The software measures each frame: how fine the stars are, how round (an oval star points to a tracking problem), the sky background brightness, the noise, the number of stars. Enough to spot frames ruined by a cloud or a gust of wind right away.
3. Stacking: adding up to bring out the signal
This is the heart of the job: stacking all the good frames to bring out the nebula and push back the noise. SyQon Studio offers several rejection methods (the calculations that throw out odd pixels, like a plane or satellite trail), stacking several nights and even several cameras.
You'll also find drizzle, a technique that gains a little resolution when you have many frames slightly shifted from one another, and support for mosaics, images assembled from several framings to cover an object too big for the field.
4. Plate solving: knowing where you are in the sky
Behind the jargon, a simple idea: the software compares the stars in your image to a catalogue and works out exactly which patch of sky you photographed. It all happens on your computer, offline.
5. Colour calibration: measured colours
Once the patch of sky is identified, SyQon Studio compares the colour of the stars in your image to their true colour, measured by the Gaia satellite, and corrects the whole image accordingly. It's the same principle as star calibration in AstroWizard: colours are no longer set by eye, they're measured.
6. Restoration: where AI comes in
This is where SyQon's AI models step in, to remove stars, reduce noise or gain sharpness. More on them just below.
7. Finishing and export
Stretching (the step that brightens the image to reveal the faint areas), colours, edits with layers and masks, then export. A history keeps track of every operation, so you can go back at any time.
The AI models: what's free, what's paid
This is where SyQon stands out. Their AI models are trained specifically on astronomical images. Everything runs locally: your images stay on your computer, nothing is sent over the internet.
| Model | What it's for | Free version |
|---|---|---|
| Axiom V3 | Remove stars, to work on the nebula alone then put them back | Light version included in Studio, and Zenith in Siril |
| DeepPrism V2 | Reduce noise, even "structured" noise like streaks | Essential profile |
| Parallax | Make the image sharper: refine stars and details | Free version in Studio, and Parallax Nano in Siril |
| Deep Gradient | Clean up the sky background (light pollution, vignetting) | Classic gradient correction included in Studio |
Two terms deserve an explanation:
- Deconvolution is what Parallax does. The atmosphere and optics spread each star's light a little, like a slightly blurry photo. Deconvolution does the reverse: it "unblurs" the image to get finer stars and sharper details. Parallax can even fix stars distorted at the edges of the image, a common flaw with small refractors.
- Structured noise is noise that forms patterns: diagonal streaks (called "walking noise"), bands. Harder to remove than ordinary grain, it's one of DeepPrism's specialities.
Prices
- SyQon Studio: free.
- DeepPrism V2, Essential profile: free. The Advanced, Ultra and Max profiles, stronger on very noisy images, are paid.
- The bundle of three models (Axiom V3, full DeepPrism V2 and Parallax): €187 as a one-off licence.
- A free 3-day trial lets you test all three models before buying.
And for Siril users, SyQon offers free lightweight versions: Zenith for star removal and Parallax Nano for sharpening, installed straight from Siril's scripts menu.
As with AstroWizard and GraXpert or StarNet2, the message is the same: the free versions already give very good results, and the paid versions are a bonus.
Which computers?
- Windows 10 (version 22H2) or 11: available.
- Apple Silicon Mac (M1 or newer), macOS 15 or later: available.
- Intel Mac and Linux: announced for early October.
You need at least 8 GB of RAM, with 16 GB recommended for comfortable work, and more for large mosaics. The software uses the graphics card when there is one, which clearly speeds up the AI steps.
First try on M 83
For the StackingWizard and AstroWizard articles, I used my M 20 frames. After a clumsy mistake, they disappeared from my drive... Never mind: SyQon Studio can stack too, so it's a chance to start from the raw frames.
The target this time: M 83, the Southern Pinwheel Galaxy, with 142 frames taken over several nights, with the Askar 71F refractor and the ASI 585MC Pro. A set closer to what a smart telescope produces, with many frames, even if each one is heavier than a Seestar S50 frame. As usual, I mainly judge how comfortable it is to use.
The welcome screen
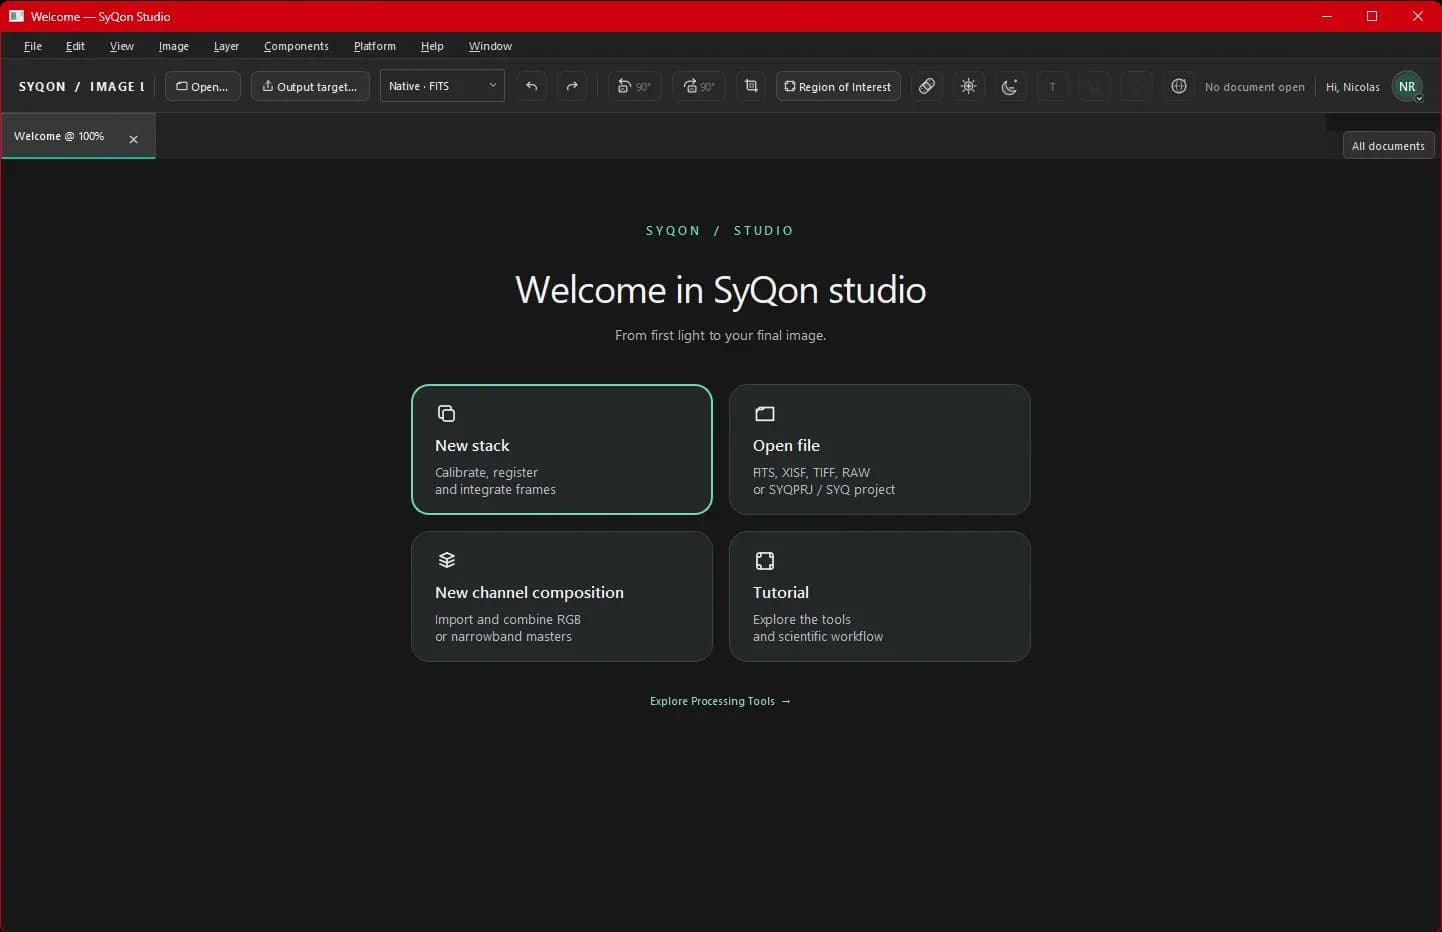
At launch, four ways in:
- New stack: start from your raw frames to calibrate, align and stack them. That's our starting point.
- Open file: open an already stacked image (FITS, XISF, TIFF, RAW) or an ongoing SyQon project.
- New channel composition: combine several images into one colour image, for those shooting with a mono camera and filters.
- Tutorial: a guided tour of the tools.
A small detail: you're greeted by your first name at the top right. You do need a SyQon account to use the software.
Stacking: Fusion Stack
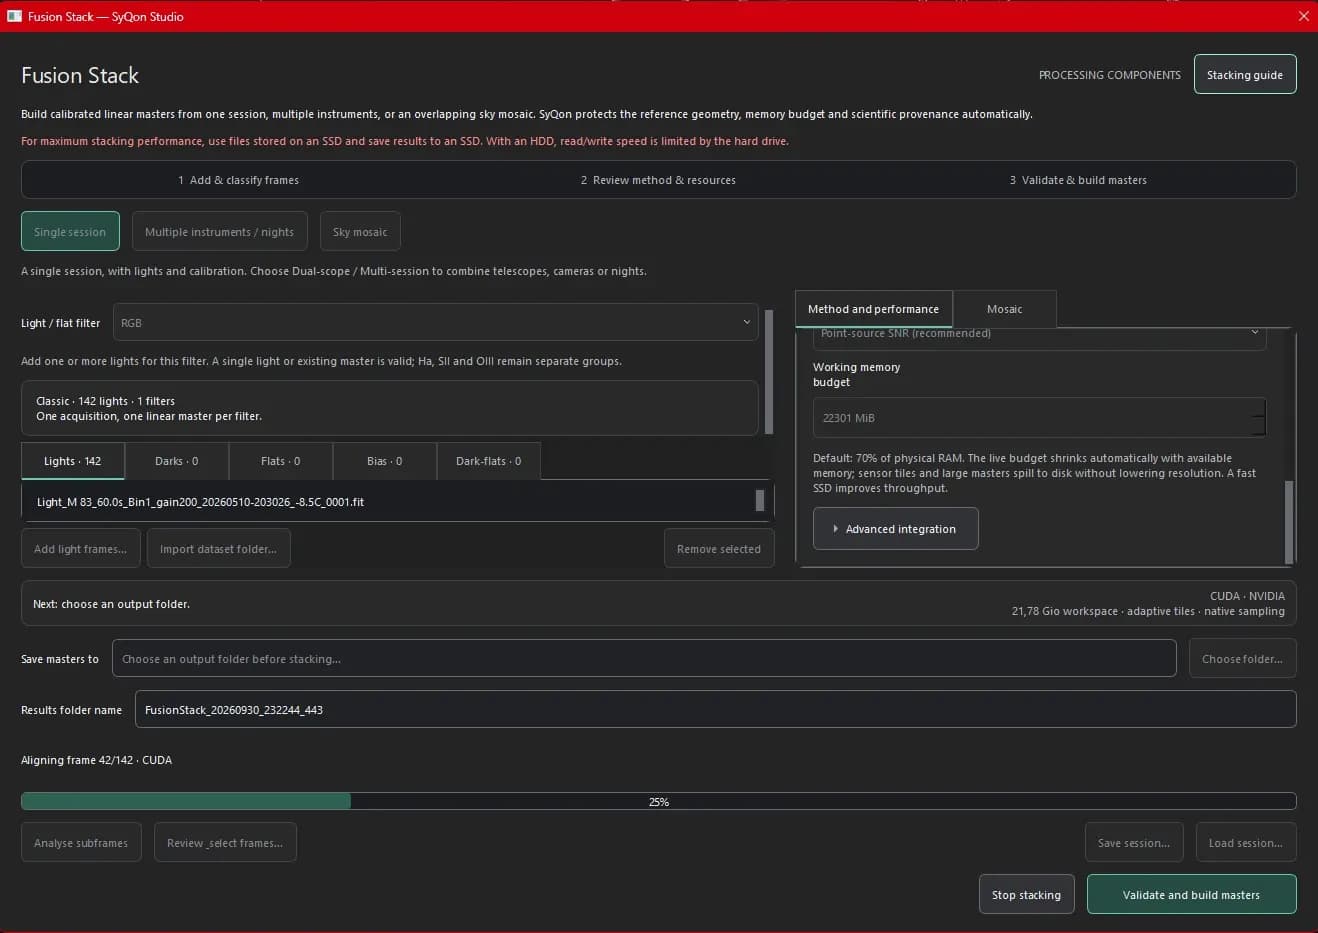
Stacking is called Fusion Stack here. The screen is busier than StackingWizard's, but it follows three numbered steps at the top: add and sort your frames, check the method, then run the calculation.
Session type. Three choices: Single session for a classic night, Multiple instruments / nights to combine several nights or instruments, and Sky mosaic for mosaics. Here, a single night.
Frames. Tabs separate Lights (the photos of the target), Darks, Flats, Bias and Dark-flats (darks taken with the same settings as the flats, to correct them in turn). You add files one by one or a whole folder at once. For M 83 I only have the 142 lights, just like with most smart telescopes: it works very well without the rest.
Method. On the right, the Method and performance panel offers a weighting mode: frames don't all count the same in the result, the best ones weigh more. The recommended mode, "Point-source SNR", judges each frame on how sharp and clean its stars are. Just below, SyQon Studio reserves 70% of the computer's memory for the calculation by default, and automatically spills over to disk if that's not enough. You can leave all of this at its default.
Speed. The software detects the graphics card (here "CUDA · NVIDIA") and uses it to speed things up. A red message also advises working on an SSD: on a classic hard drive, the drive's speed limits stacking. Advice worth taking seriously when stacking hundreds of smart telescope frames.
Sorting frames: Subframe Inspector
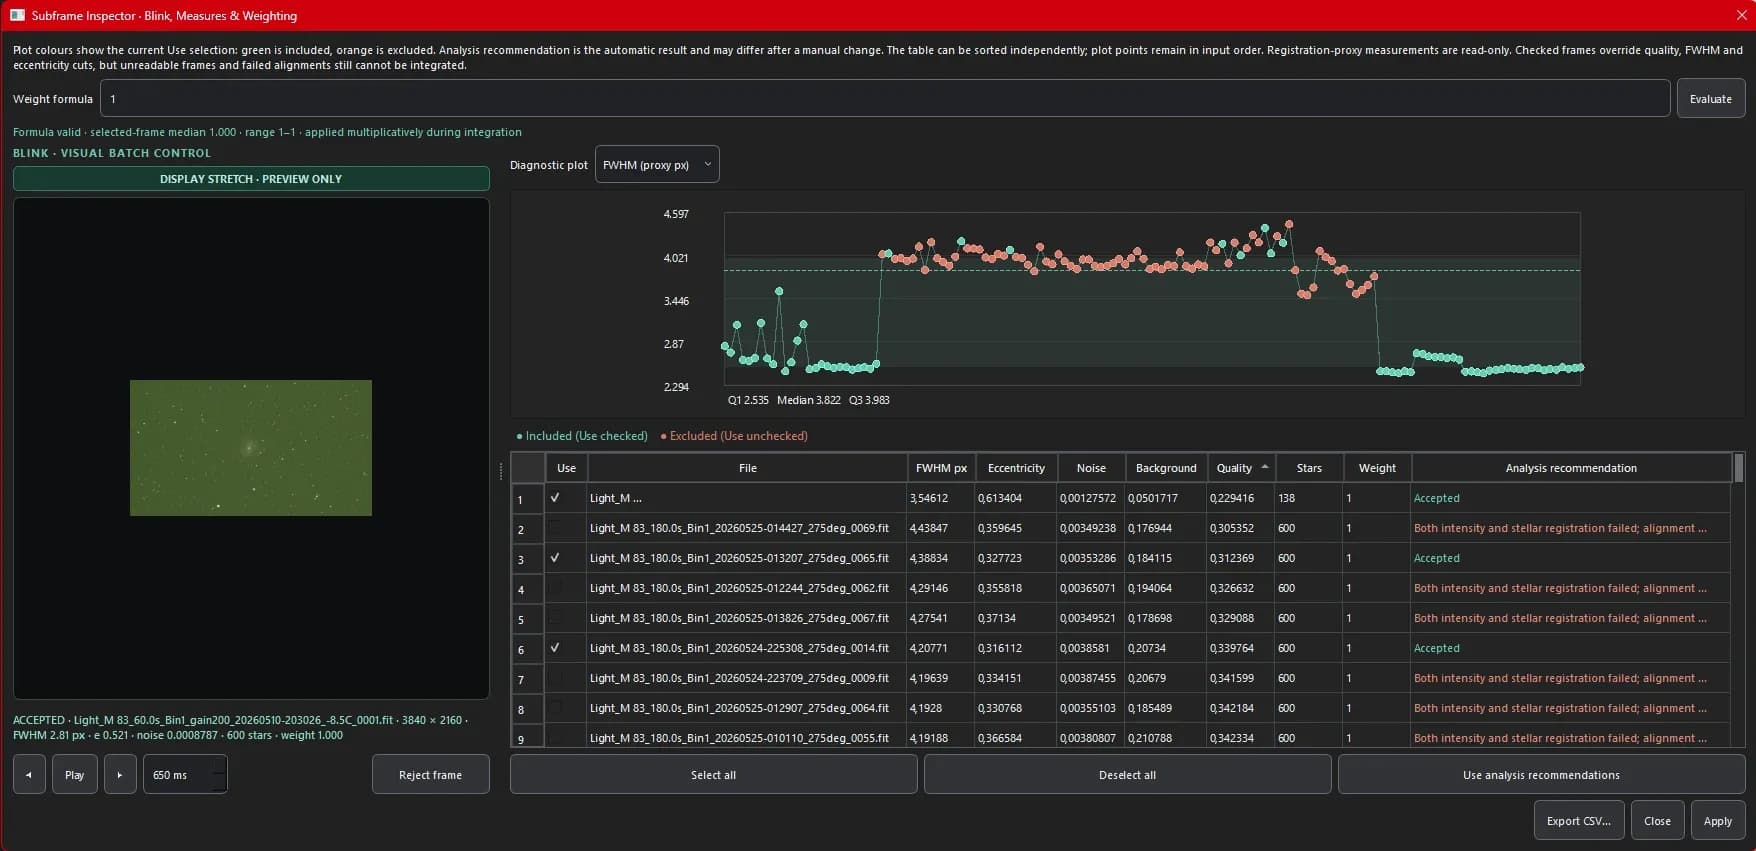
Before stacking, the Analyse subframes button measures each frame, and Review / select frames opens the Subframe Inspector to sort them. It's the equivalent of StackingWizard's "Looking Glass", in much more detail.
- The table gives, for each frame, how fine the stars are (FWHM: the smaller the number, the finer the stars), how round (Eccentricity: close to 0 the stars are nicely round, higher they're oval because of a tracking or wind issue), the noise, the sky background brightness, a quality score and the number of stars detected. The last column gives the software's recommendation: keep or discard.
- The plot at the top shows how a measurement changes across frames, here star sharpness. Green dots are kept frames, orange ones discarded. You spot at a glance the series where stars bloated.
- On the left, a preview of each frame, with a Play button that runs them like a short film: handy to spot a cloud, a plane or a shift. The image looks all green, which is normal: it's the raw, uncalibrated frame, and the preview is display only.
- At the bottom, Use analysis recommendations applies the software's sorting in one click. For beginners, that's the right move.
Out of my 142 frames, SyQon Studio kept 68. In particular, it discarded the frames from a night where my framing was different: impossible to stack them cleanly with the others, and the software caught it.
The calculation
All that's left is to choose an output folder and run the calculation. The progress bar says clearly what's happening, here aligning frame 42 of 142. The Save session and Load session buttons let you save your settings to pick up later.
Result: the 68 kept frames were calibrated, aligned and stacked in 4 minutes, using the graphics card. A perfectly decent time.
The processing workspace
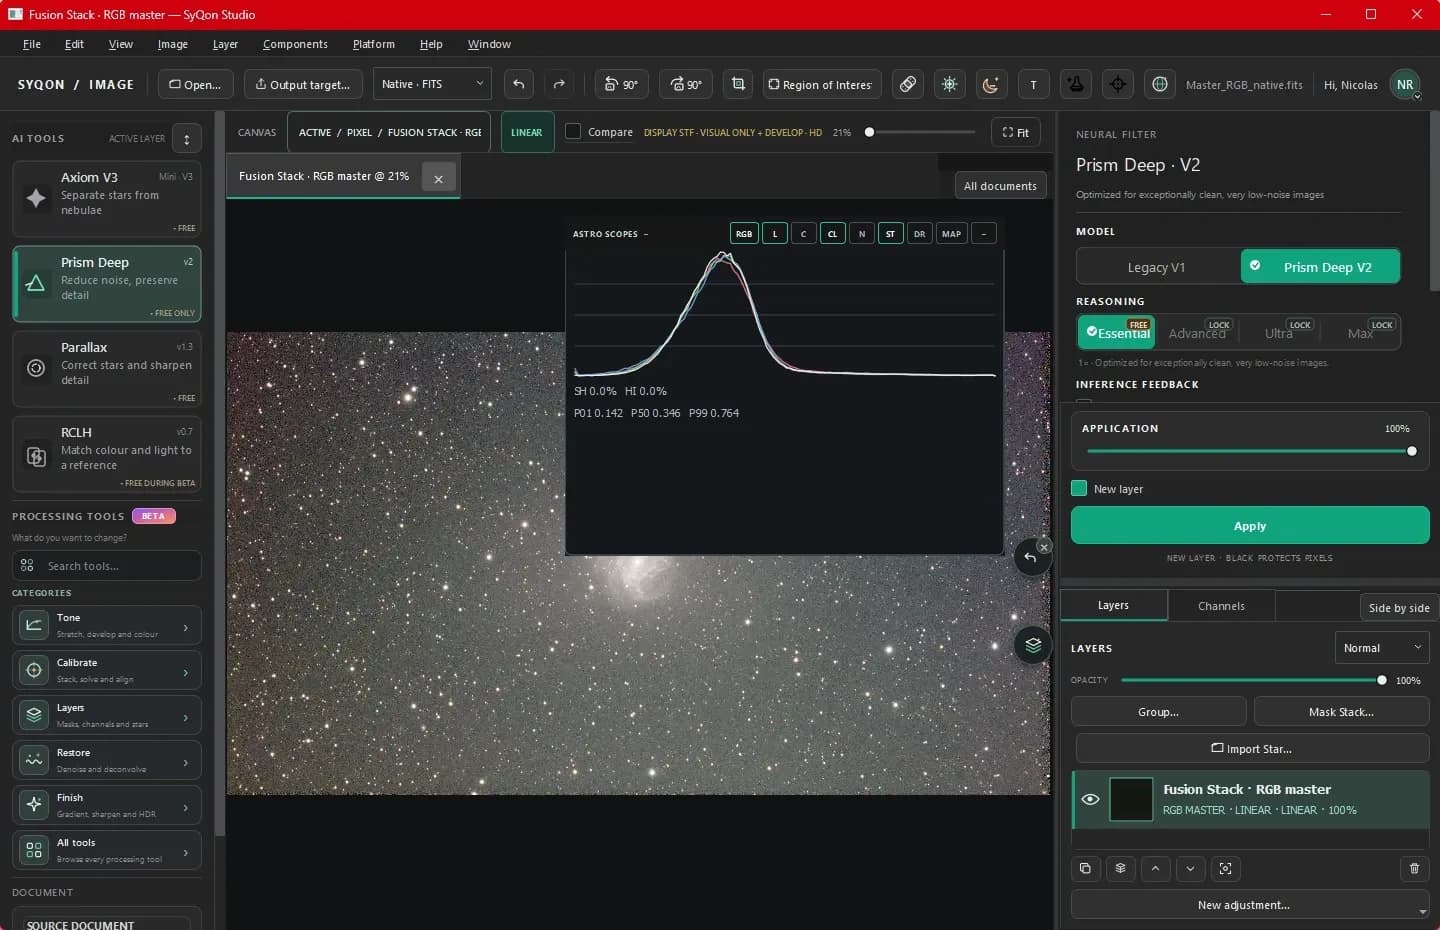
Once stacking is done, the image opens in the processing workspace. It's dense, but well organised in three columns.
On the left, the tools. At the top, the AI tools: Axiom V3 to remove stars, Prism Deep for noise, Parallax for sharpness, and RCLH, which matches your image's colours and brightness to a reference image. A nice surprise: each one exists in a free version right in the software (a light version of Axiom, Prism Deep's Essential profile...). Below, all the classic tools sorted by category: Tone for stretching and colour, Calibrate for stacking and alignment, Layers for layers and masks, Restore for noise and sharpness, Finish for the sky background and finishing touches. A search bar also lets you type what you want to do.
In the centre, the image. It's still "linear", meaning straight out of stacking and almost black: what you see on screen is only a brightened preview (the yellow label reminds you). The Astro Scopes panel shows the histogram, a curve showing how pixels are spread from darkest to brightest. A well-placed hump, with the three colours on top of each other, means a neutral sky background. The Compare box lets you compare before and after.
On the right, the selected tool's settings and the layers. Here, Prism Deep V2: you pick the profile (Essential is free, Advanced, Ultra and Max are paid), the strength, then apply. The New layer box puts the result on a new layer, a bit like a transparent sheet laid over the image: you can adjust its opacity, hide it or delete it without ever damaging the original.
And then I got lost
Up to here, all was well. Things got complicated when it came to processing the image.
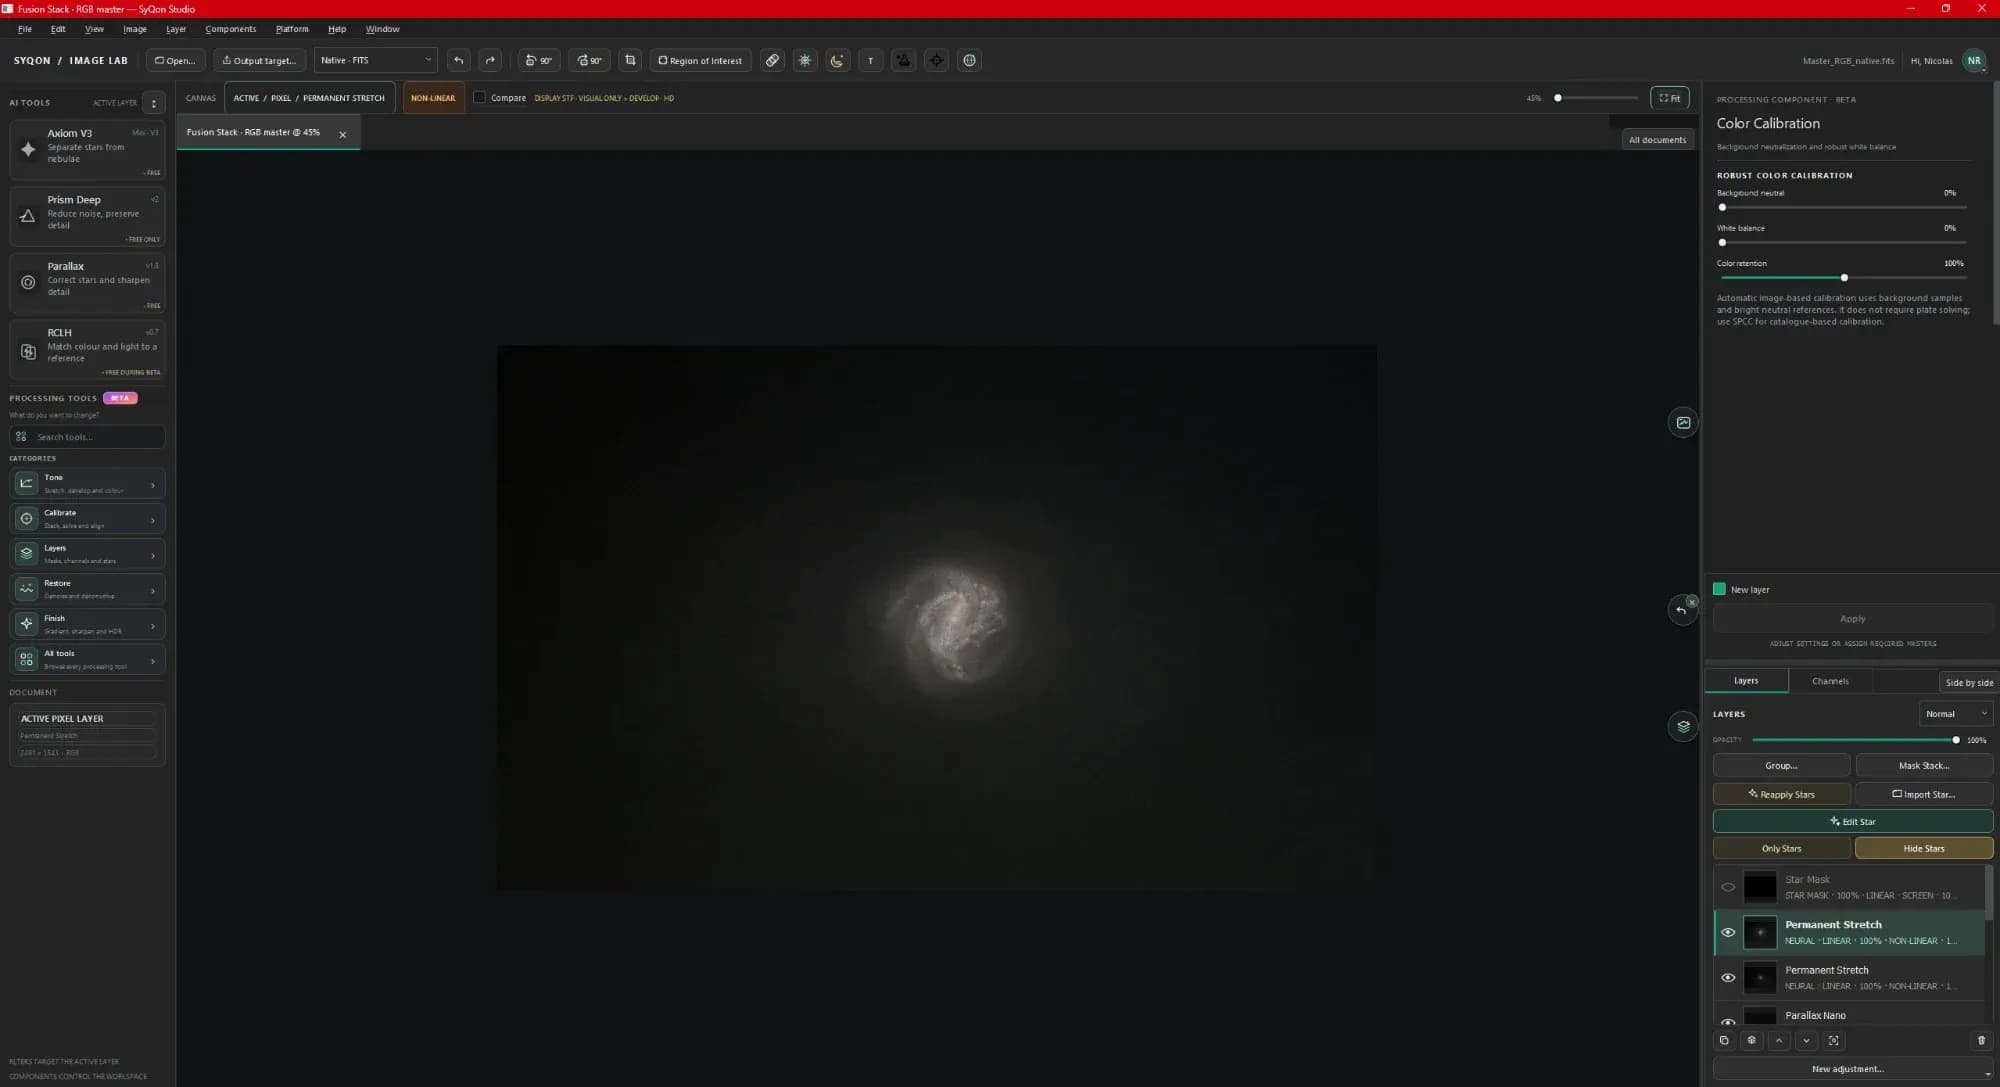
Lots of tools, each with its own settings, and a layer stack that grows with every attempt: two stretches, a sharpening layer, a star mask, a highlight compression... After a few steps, I no longer really knew which layer I was working on, or in what order to do things.
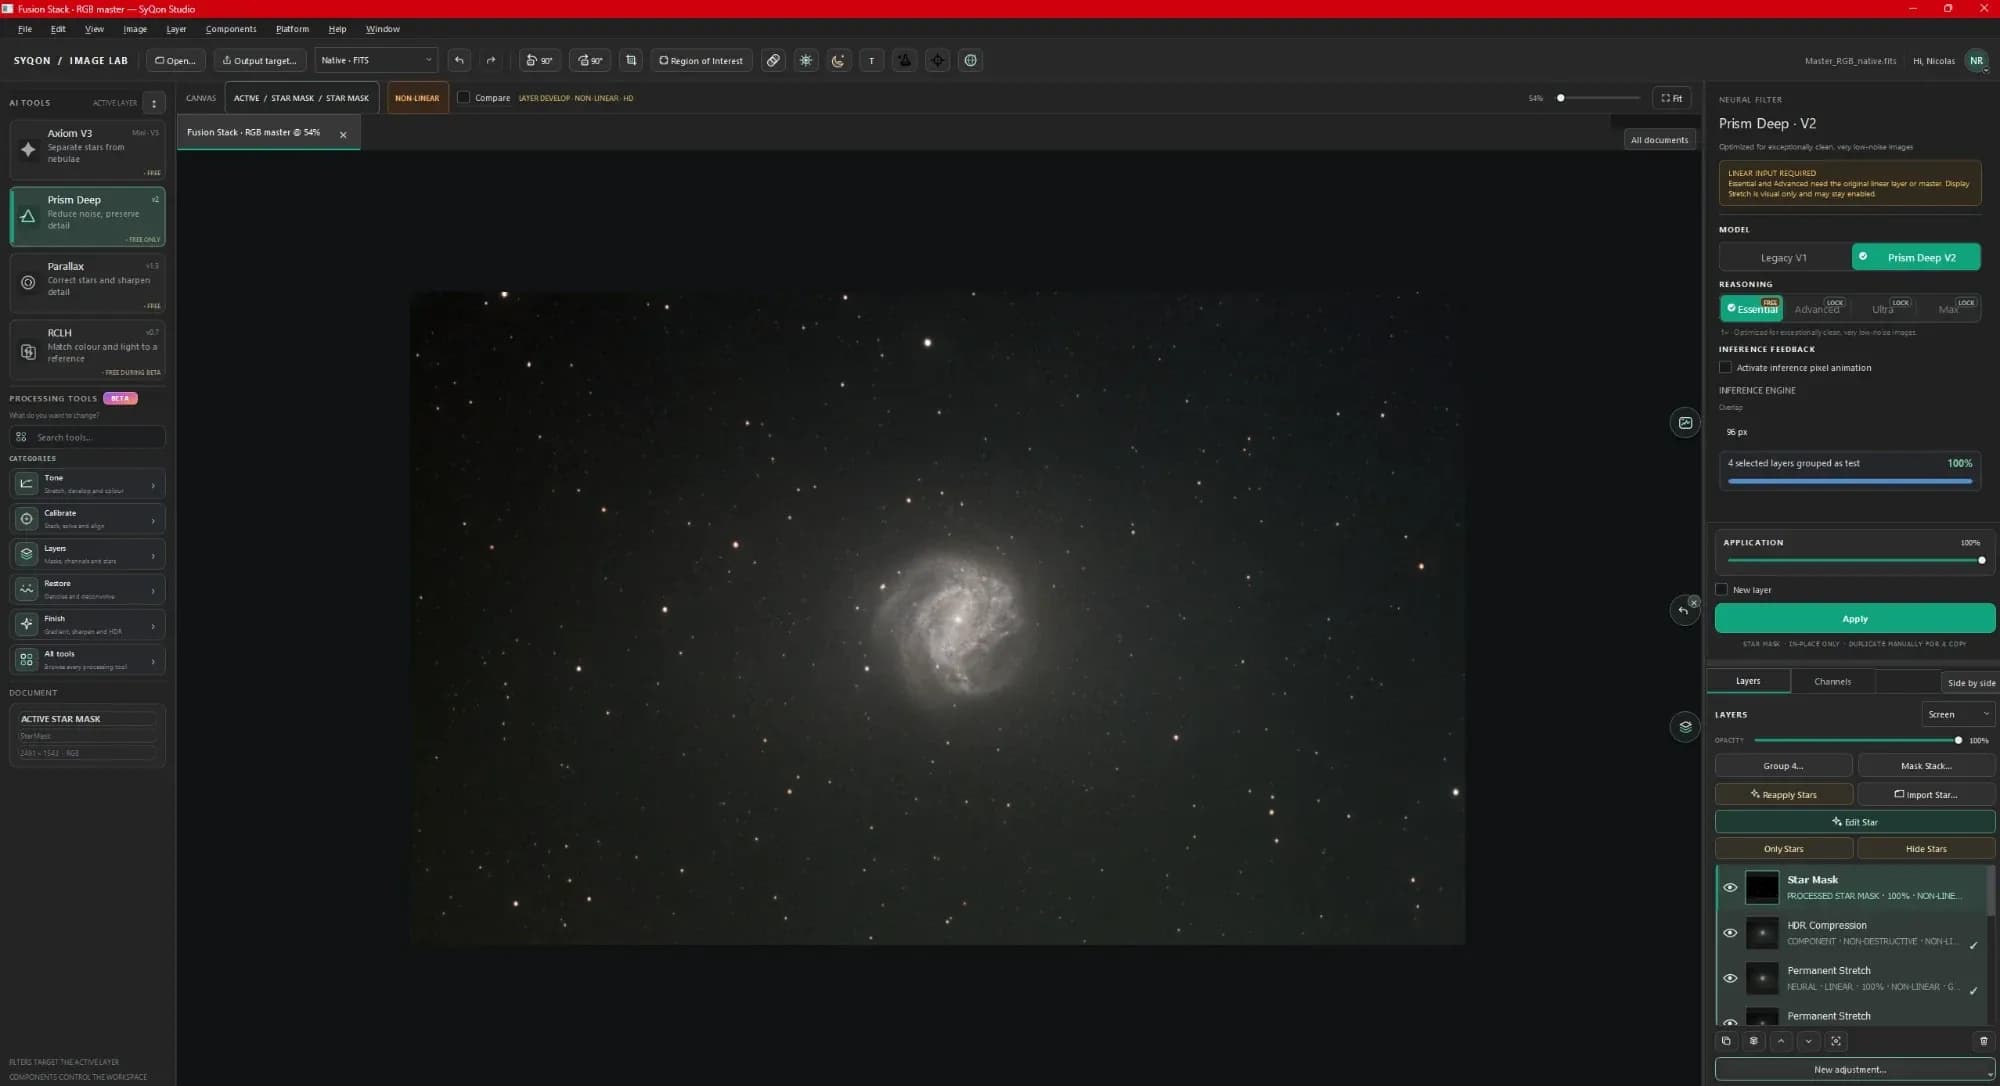
A typical example: after stretching the image, I wanted to reduce the noise with Prism Deep. A yellow message then warned me that the tool needs the original linear image, meaning the one from before the stretch. Nothing serious, but it's the kind of information you'd like to have before diving in. The online guide didn't help me much to see more clearly.
Let's be honest: I have experience with Siril, StackingWizard and AstroWizard, and these days I mostly process with PixInsight. Software that isn't known for being simple either, yet I got to grips with it much more easily. And I couldn't get to the end on this first try. It's not a question of the tools' quality. It's a question of getting to grips with it, which simply can't be improvised.
A suggestion in the meantime: SyQon to stack, AstroWizard to process
The good news is that the two programs complement each other very well. SyQon Studio saves the stacked image as a FITS file, and AstroWizard opens FITS files from any software. So you can take advantage of SyQon's very convincing stacking, then process the image step by step in AstroWizard. All for free.
Who is it for?
- For stacking: SyQon Studio can be recommended right now. Frame sorting is precise, the calculation is fast, and it handles a simple night as well as several nights or a mosaic.
- For processing: if you're a beginner, AstroWizard remains much simpler, with its guided path. SyQon Studio's processing is more for those who already have experience and want full control, or who are ready to spend time taming it.
- You already use Siril: start with the free Zenith and Parallax Nano versions, right in Siril.
My take on this first contact
This first discovery run leaves me with mixed but rather positive feelings. Not everything is clear yet, and I got lost in the processing. Yet the potential is definitely there. You can feel the thinking behind each tool: stacking is solid, frame sorting very thorough, and the AI models have already proven themselves. It's just that software this complete can't be mastered in one evening, and that takes nothing away from its quality.
So I'll persevere, take the time to understand the logic of the layers and the order of the tools, and I'll come back with a real review, final image included.
What I liked:
- Stacking, complete and fast: 68 frames in 4 minutes.
- Frame sorting, very detailed, which caught my badly framed night on its own.
- The free all-in-one, from stacking to export.
- Free versions of the AI tools, right in the software.
- Local processing, nothing sent over the internet.
What could be better at this stage:
- Heavy software. Everything is there, but everything comes at once. On first launch alone, no fewer than 121 tip bubbles follow one another to introduce the tools: that says a lot about how much there is to take in.
- A stark interface. The windows are busy, with lots of numbers and settings. They remain logical, in processing order, but it's not the most welcoming software.
- Not very intuitive for beginners. With a bit of guidance the first few times, you should find your bearings, but on your own you get lost quickly.
- Processing that's hard to get to grips with. Lots of tools, a layer stack you quickly lose track of, and little guidance on the order to follow, like Prism Deep asking for the original linear image once the stretch is done.
- It's a beta. Bugs and changes are to be expected, and the tutorials will surely grow.
Where to download it
SyQon Studio is available for free on SyQon's website: syqon.eu/syqonstudio. You need to create an account to download it.
For the free versions in Siril: Scripts menu, then Get Scripts, and search for "SyQon" or "Parallax".
Frequently asked questions
Is SyQon Studio free?
Yes. The software is free, including stacking, calibration, mosaics and the classic processing tools. Only the advanced AI models (Axiom V3, DeepPrism V2 beyond the Essential profile, Parallax) are paid: €187 for all three, with a free 3-day trial.
Do I need an internet connection to process my images?
No. Processing, including the AI steps, happens entirely on your computer. An account is needed to download the software and activate the paid models.
Does it work with smart telescope images?
Yes. It opens common formats (FITS, TIFF, XISF, and even PNG, JPEG and camera RAW files), so frames from a Seestar or a Dwarf as well as from an astro camera.
SyQon Studio or AstroWizard?
They complement each other. SyQon Studio is excellent for stacking, and offers very complete processing that's hard to get to grips with. AstroWizard guides you step by step through processing. For beginners, the simplest is to stack in SyQon Studio, then process in AstroWizard.